kubernetes

Kubernetes Part 6 of n : Health Checks / Readiness Probes / Scaling Deployments

So this post will continue to build upon our example pod/deployment/service that we have been using for the entire series of posts. Just a reminder the rough outline is as follows:


  1. What is Kubernetes / Installing Minikube
  2. What are pods/labels, declaring your first pod
  3. Services
  4. Singletons, such as a DB
  5. ConfigMaps/Secrets
  6. LivenessProbe/ReadinessProbe/Scaling Deployments (this post)


Where is the code again?


What did we talk about last time?

Last time we looked at config maps/secrets.


So what is this post about?

This time we will focus our attention on the following

  • Liveness probes
  • Readingess probes
  • Scaling Deployments


Liveness Probes

Liveness probes are used by Kubernetes to work out whether a container is deemed healthy. There are several reasons that a container might be deemed unhealthy, such as

  • A deadlock
  • Unable to make progress

Kubernetes allows us to create either a Tcp/Http endpoint that can be used to test for liveness. Here is an example of what the pod definition should contain for a livenessProbe


livenessProbe:
      httpGet:
        path: /healthz
        port: 8080
        httpHeaders:
        - name: X-Custom-Header
          value: Awesome
      initialDelaySeconds: 3
      periodSeconds: 3


Lets talk about some of that

  • httpGet states that our container exposes a http GET endpoint at path “/healthz” at port “8080”
  • initialDelaySeconds : Is the amount of time we instruct Kubernetes to wait before calling our livenessProbe endpoint
  • periodSeconds : Is simple the time between 2 successive probes


Changing Our App To Support this

So for our demo app I wanted to make a change such that when the livenessProbe GET endpoint was called the result would be either a Success (Http Status 200) or a BadRequest(Http Status 400) which is picked randomly.


Ok so to alter our ongoing demo app to support this lets add a new model for the route

using ServiceStack;

namespace sswebapp.ServiceModel
{
    [Route("/healthcheck","GET")]
    public class HealthCheck 
    {
        
    }

}


And then update the ServiceStack service

using System;
using System.Collections.Generic;
using System.Net;
using System.Text;
using MySql.Data.MySqlClient;
using ServiceStack;
using sswebapp.ServiceModel;

namespace sswebapp.ServiceInterface
{
    public class MyServices : Service
    {

        private Random rand = new Random();

		......
		......
		......
		

        public object Get(HealthCheck healthCheck)
        {
            var someRandom = rand.Next(10);
            return new HttpResult()
            {
                StatusCode = someRandom > 5 ? HttpStatusCode.OK : HttpStatusCode.BadRequest,
                ContentType = "application/json"
            };
        }
    }
}


Why would we do this?

Well its obviously just to satisfy the demo such that when asking for more than 1 copy of the app when scaling up the deployment, we can simulate some random unhealthy behavior which should cause Kubernetes to kill the offending pod, and create a new one to satisfy our deployment requirements. You would not do this in a real health check endpoint.


Readiness Probes

Sometimes, applications are temporarily unable to serve traffic. For example, an application might need to load large data or configuration files during startup. In such cases, you don’t want to kill the application, but you don’t want to send it requests either. Kubernetes provides readiness probes to detect and mitigate these situations. A pod with containers reporting that they are not ready does not receive traffic through Kubernetes Services.


Readiness probes are configured similarly to liveness probes. The only difference is that you use the readinessProbe field instead of the livenessProbe field.


Taken from : https://kubernetes.io/docs/tasks/configure-pod-container/configure-liveness-readiness-probes/ up on date 10/04/2018


Another way to think about readinessProbe maybe that your app has other dependencies that also need to be started before your app starts. Say you need to be able to communicate with another database, that also needs to be running before your app is deemed ready. You could work this logic into the value you return from a  readinessProbe.


Both readiness and liveness probes can be used in parallel for the same container, which should ensure that traffic does not reach your container until its actually ready (readinessProbe) and that the container is started when it is deemed unhealthy (livenessProbe)


Running The App

As we have done before we need to launch our pod/service where we start with a single instance running, which we will look to scale out in a moment


As always we need to ensure MiniKube is running first

cd\
.\minikube.exe start --kubernetes-version="v1.9.0" --vm-driver="hyperv" --memory=1024 --hyperv-virtual-switch="Minikube Switch" --v=7 --alsologtostderr 


Then we need to run our pod/deployment (this will start a single instance of the ServiceStack pod rest endpoint, which is what we have defined/asked for in the deployment.yaml file)

.\kubectl.exe apply -f C:\Users\sacha\Desktop\KubernetesExamples\Post6_SimpleServiceStackPod_HealthChecks\sswebapp\deployment.yaml
.\kubectl.exe apply -f C:\Users\sacha\Desktop\KubernetesExamples\Post6_SimpleServiceStackPod_HealthChecks\sswebapp\service.yaml


Ok with that in place, we do our usual thing, where we can grab the url for the service and hit it up


.\minikube service simple-sswebapi-service --url 


Grab the url and use postman to test the app say the XXXX/Hello/sacha route


If that is all working, we can then move on to look at how to scale our deployment up, and how it interacts with the livenessProbe we set up above (which may or may not fail when hit)


Scaling Deployments

So now that we have our deployment/service up and running with what is defined in the deployment.yaml, lets type this in

.\kubectl.exe describe deployment simple-sswebapi-pod-v1

We should see something like this output

image

Lets also check the pods

image

All good only 1 instance of our pod there too.


Now lets try and scale it up using this command

.\kubectl scale deployment simple-sswebapi-pod-v1 --replicas=5

Lets check the deployment now

image

Aha we now have 5 desired and 5 total and 2 available and 3 starting to come up

Now lets check the pods, here I issued the command a couple of times quickly and you can see the pods starting to come up

image

And in the 2nd part, all 5 are running

So now what we should be able to do is grab the url of the service for a endpoint, such as :

\minikube service simple-sswebapi-service --url

image

Now grab that url, and try the livenessProbe route, so for this example the full route would be http://192.168.0.29:32383/healthcheck. Try that in postman and then keep checking the pods anytime you get a HTTP status code of 400. Kubernetes should try to keep our desired state of 5 pods up and running by restarting the pod that gave us the 400 status code for the livenessProbe HTTP Get


Conclusion

So that’s it, we have reached the end of this mini Kubernetes journey. I hope you have fun following along.


I have had fun (and some tense moments) writing this series.


I did not cover these things, which you may like to research on your own, happy Kuberenetes


Up next to me is some more Azure stuff, then its either Scala Cats, or Embedded Kafka and some more Kafka Streams stuff

kubernetes

Kubernetes Part 5 of n : Config Maps and Secrets


So this post will continue to build upon our example pod/deployment/service that we have been using for the entire series of posts. Just a reminder the rough outline is as follows:


  1. What is Kubernetes / Installing Minikube
  2. What are pods/labels, declaring your first pod
  3. Services
  4. Singletons, such as a DB
  5. ConfigMaps/Secrets (this post)
  6. LivenessProbe/ReadinessProbe/Scaling Deployments


Where is the code again?


What did we talk about last time?

Last time we continued to use services, but last time we showed how you can use service to expose a singleton, such as a database, where we expect there only to be a single pod behind the service. We also talked about DNS lookups for aiding in discovery and finally using ClusterIP : None, which allowed us to address the pod directly.


So what is this post about?

This time we will focus our attention to 2 more bits of Kubernetes functionality

  • Config Maps
  • Secrets

We will continue to adjust our example pod that we have been using for the entire series so far. But before we do that lets just talk about some of the concepts behind Config Maps/Secrets in Kubernetes


Before we Start

Lets make sure minikube is up and running by using this

cd\
.\minikube.exe start --kubernetes-version="v1.9.0" --vm-driver="hyperv" --memory=1024 --hyperv-virtual-switch="Minikube Switch" --v=7 --alsologtostderr 


What is a ConfigMap?

This is what the official docs say


ConfigMaps allow you to decouple configuration artifacts from image content to keep containerized applications portable. This page provides a series of usage examples demonstrating how to create ConfigMaps and configure Pods using data stored in ConfigMaps.


From https://kubernetes.io/docs/tasks/configure-pod-container/configure-pod-configmap/ up on date 29/03/18


There are many ways to create config files, such as


I am just going to concentrate on “Create ConfigMaps from files” as that fitted the bill of what I wanted to do with the pod that I have been altering for this series of posts. So lets have a look at that shall we.


Lets say I had a file called this “sachaserver-properties”, which held this content:


{
    "K8sConfigSetting1": "**** Config from K8s!!! ****"
}


I could easily try and create a config map from this file as follows:


.\kubectl.exe create configmap server-config --from-file=C:\Users\sacha\Desktop\KubernetesExamples\Post5_SimpleServiceStackPod_ConfigMapsSecrets\configmap_secrets\sachaserver-properties

So lets see what happens when I run that in PowerShell


image


Mmm was not expecting that. So the filename is important and has a regex associated with it of [-._a-zA-Z0-9]+


But hang on my file is called “sachaserver-properties“, so this should match the regex required by Kubernetes. Can you spot what’s wrong. That right the path is being used as part of the filename, which Kubernetes doesn’t like. We will see why in just a minute.


So the answer is to just copy the file to the same folder as kubctl.exe and then lets try this command


.\kubectl.exe create configmap server-config --from-file=C:\sachaserver-properties

This seems to go better

image

Lets have a closer look at the config map that we created here

.\kubectl.exe describe configmaps server-config

image


.\kubectl.exe get configmaps server-config -o yaml

image


There are a couple of things to note here:

  • That the ConfigMap has a Data section which is really just a key-value store
  • What’s really interesting is that the original file name (and we could have used multiple files so would have ended up with multiple keys in the Data section) that we used is used as the name of the key inside this ConfigMap Data section. This is WHY Kubernetes baulked at us earlier where we were using the FULL path to try and create the ConfigMap. It needs to be a simple key, that will end up being a key in this Data section
  • The other interesting thing is what happens with the original file(s) content. The content from the file/files is used as the value for the key (representing the file) inside of the Data section. As you can see this “sachaserver-properties” key does indeed contain all the original contents of the file that I showed above.


So that’s pretty cool. But what can I do with this ConfigMap?

Well now that we have a ConfigMap we need to think about how to use it inside our own pods. Again there are several different ways, where I will concentrate on one of them


Can we test this out before we move onto changing our main pod?

It’s not a lot of work to upload a new image to Docker Cloud, but I am the sort of guy that likes to know things work before I upload it somewhere, and then have to tear it down, and redo it again. So is there a way that I can check this ConfigMap stuff is working as expected locally using some existing Docker image before I change the code for the pod that we have been using to date for this series of posts?


Well actually yes there is, there is our old friend busybox (the swiss army knife of containers). We can use a busybox pod in a couple of ways to verify the config map is working as expected

  • We can check the mount works ok
  • We can check that the data contents of the ConfigMap is as expected


Lets see how


Checking the mount works ok

So lets say we have a busybox pod that looks like this (this is busybox-ls-pod.yaml in source code)

apiVersion: v1
kind: Pod
metadata:
  name: busybox-ls-pod
spec:
  containers:
    - name: test-container
      image: k8s.gcr.io/busybox
      command: [ "/bin/sh", "-c", "ls /k8s/config" ]
      volumeMounts:
      - name: config-volume
        mountPath: /k8s/config
  volumes:
    - name: config-volume
      configMap:
        # Provide the name of the ConfigMap containing the files you want
        # to add to the container
        name: server-config
  restartPolicy: Never


We can then run this like

.\kubectl.exe apply -f C:\Users\sacha\Desktop\KubernetesExamples\Post5_SimpleServiceStackPod_ConfigMapsSecrets\configmap\busybox-ls-pod.yaml

And check its logs like this

.\kubectl logs busybox-ls-pod

Which gives us output like this

image

Ok, so that is good looks like the mount is working ok.


Checking the data contents is ok

So now that we know the mount is ok, how about the data contents from the mounted config map. Lets see an example of how we can check that using another busybox pod (this is busybox-cat-pod.yaml in source code)

apiVersion: v1
kind: Pod
metadata:
  name: busybox-cat-pod
spec:
  containers:
    - name: test-container
      image: k8s.gcr.io/busybox
      command: [ "/bin/sh","-c","cat /k8s/config/sachaserver-properties" ]
      volumeMounts:
      - name: config-volume
        mountPath: /k8s/config
  volumes:
    - name: config-volume
      configMap:
        # Provide the name of the ConfigMap containing the files you want
        # to add to the container
        name: server-config
  restartPolicy: Never


We can then run this like

.\kubectl.exe apply -f C:\Users\sacha\Desktop\KubernetesExamples\Post5_SimpleServiceStackPod_ConfigMapsSecrets\configmap\busybox-cat-pod.yaml

And check its logs like this

.\kubectl logs busybox-cat-pod

Where we get output like this

image

Cool this looks to be working as expected as well


What is a Secret?

Right now there is not much difference between secretes and ConfigMaps in Kubernetes. The only real difference is how you create the data that you want to be stored in the first place, where the recommendation is to use Base64 encoded values for your secrets


There is a slightly different command like to run, and the way you mount the volume in your pod is also slightly different, but conceptually its not that different (right now, but I would imagine this might change to use some other mechanism over time).


Base64 Encoding

So the recommendation is to base64 encode our secret values, and if you are a linux/bash user this is how you can do it

image


Or you could just use one of the many base64 encoding/decoding sites on line such as : https://www.base64decode.org/


So once you have done that for whatever you want to keep as a secret we can put them in a file such as this one (this is the sachaserver-secrets-properties file in the demo source code)

{
    "K8sSecret1": "KioqKiBTZWNyZXQgZnJvbSBLOHMgKioqKg=="
}


In here the base64 encoded string is really “**** Secret from K8s ****


As before the secrets file must not contain any \\ or \ characters which means moving it to the C:\ for me (at least on Windows anyway). So here is the code that copies the file and also creates the secret from the input secret file sachaserver-secrets-properties


Remove-Item c:\sachaserver-secrets-properties
Copy-Item C:\Users\sacha\Desktop\KubernetesExamples\Post5_SimpleServiceStackPod_ConfigMapsSecrets\secrets\sachaserver-secrets-properties -Destination c:\sachaserver-secrets-properties
.\kubectl.exe create secret generic server-secrets --from-file=sachaserver-secrets-properties


We can do some simple tests to make sure it looks ok, but we will also use our favorite busybox pod to really check it out. For now lets run some rudimentary tests

.\kubectl.exe describe secrets server-secrets
.\kubectl.exe get secrets server-secrets -o yaml


But as we just said we can/should use busybox to confirm everything is ok before we start to make adjustments to our own pod. Lets move on to see what the busybox stuff looks like for this secrets stuff


We can use a busybox pod in the same way we used it with the configmap stuff, to verify the secrets we just crested is working as expected

  • We can check the mount works ok
  • We can check that the data contents of the secrets is as expected


Lets see how


Checking the mount works ok

So lets say we have a busybox pod that looks like this (this is busybox-secrets-ls-pod.yaml in source code)

apiVersion: v1
kind: Pod
metadata:
  name: busybox-secrets-ls-pod
spec:
  containers:
    - name: test-container
      image: k8s.gcr.io/busybox
      command: [ "/bin/sh", "-c", "ls /k8s/secrets" ]
      volumeMounts:
      - name: secrets-volume
        mountPath: /k8s/secrets
  volumes:
    - name: secrets-volume
      secret:
        # Provide the name of the Secret containing the files you want
        # to add to the container
        secretName: server-secrets
  restartPolicy: Never


We can then run this like

.\kubectl.exe apply -f C:\Users\sacha\Desktop\KubernetesExamples\Post5_SimpleServiceStackPod_ConfigMapsSecrets\secrets\busybox-secrets-ls-pod.yaml

And check its logs like this

.\kubectl logs busybox-secrets-ls-pod

Which gives us output like this

image


Ok, so that is good looks like the mount is working ok.


Checking the data contents is ok

So now that we know the mount is ok, how about the data contents from the mounted secretes. Lets see an example of how we can check that using another busybox pod (this is busybox-secrets-cat-pod.yaml in source code)

apiVersion: v1
kind: Pod
metadata:
  name: busybox-secrets-cat-pod
spec:
  containers:
    - name: test-container
      image: k8s.gcr.io/busybox
      command: [ "/bin/sh","-c","cat /k8s/secrets/sachaserver-secrets-properties" ]
      volumeMounts:
      - name: secrets-volume
        mountPath: /k8s/secrets
  volumes:
    - name: secrets-volume
      secret:
        # Provide the name of the Secret containing the files you want
        # to add to the container
        secretName: server-secrets
  restartPolicy: Never


We can then run this like

.\kubectl.exe apply -f C:\Users\sacha\Desktop\KubernetesExamples\Post5_SimpleServiceStackPod_ConfigMapsSecrets\secrets\busybox-secrets-cat-pod.yaml

And check its logs like this

.\kubectl logs busybox-secrets-cat-pod

Where we get output like this

image


Cool this looks to be working as expected as well


What’s changed in the demo app?

Ok so far no blockers, what have we got working so far?

Well we now have this working

  • A working configmap
  • A correctly proved out volume mapping for the configmap
  • The ability to confirm the configmap file is present in the mapped volume for the configmap
  • The ability to read the contents of the configmap file within the mapped volume for the configmap
  • A working secret
  • A correctly proved out volume mapping for the secret
  • The ability to confirm the secret file is present in the mapped volume for the secret
  • The ability to read the contents of the secret file within the mapped volume for the secret

I demonstrated ALL of this above. So now we should be in a good place to adjust our pod / deployment that we have been working on for this entire series. Just to remind ourselves of what the demo pod did here is what we have working so far


So what do we need to change to support the configmap/secret stuff that we are trying to demo for this post.


Change The Deployment For The Pod

We obviously need to make changes to the demo deployment/pod definition to support the configmap/secrets stuff, so this is the new deployment file for this post


Post5_SimpleServiceStackPod_ConfigMapsSecrets\sswebapp\deployment.yaml


apiVersion: extensions/v1beta1
kind: Deployment
metadata:
  name: simple-sswebapi-pod-v1
spec:
  replicas: 1
  template:
    metadata:
      labels:
        app: run=sswebapi-pod-v1
    spec:
      containers:
      - name: sswebapi-pod-v1
        image: sachabarber/sswebapp-post-5:v1
        ports:
        - containerPort: 5000
        volumeMounts:
        - name: config-volume
          mountPath: /k8s/config
        - name: secrets-volume
          mountPath: /k8s/secrets          
      volumes:
        - name: config-volume
          configMap:
            # Provide the name of the ConfigMap containing the files you want
            # to add to the container
            name: server-config
        - name: secrets-volume
          secret:
            # Provide the name of the Secret containing the files you want
            # to add to the container
            secretName: server-secrets            


Something That Reads The Input Files

So we established above that once we have some mapped volumes that the configmap/secret files should be available at the mounts specified above. So how do we read these files? Previously we were using busybox and using cat, and now we are in .NET Core land. Mmmm


Luckily the .NET Core configuration system working just fine reading these files, here is how we do it in the adjusted Startup.cs class

using Microsoft.AspNetCore.Builder;
using Microsoft.AspNetCore.Hosting;
using Microsoft.Extensions.DependencyInjection;
using Microsoft.Extensions.Configuration;
using Funq;
using ServiceStack;
using ServiceStack.Configuration;
using sswebapp.ServiceInterface;
using ServiceStack.Api.Swagger;
using System.Text;

namespace sswebapp
{
    public class Startup
    {
        public static IConfiguration Configuration { get; set; }

        public Startup(IConfiguration configuration) => Configuration = configuration;

        // This method gets called by the runtime. Use this method to add services to the container.
        // For more information on how to configure your application, visit https://go.microsoft.com/fwlink/?LinkID=398940
        public void ConfigureServices(IServiceCollection services)
        {
        }

        // This method gets called by the runtime. Use this method to configure the HTTP request pipeline.
        public void Configure(IApplicationBuilder app, IHostingEnvironment env)
        {
            if (env.IsDevelopment())
            {
                app.UseDeveloperExceptionPage();
            }

            var builder = new ConfigurationBuilder()
                .SetBasePath(env.ContentRootPath)
                .AddJsonFile("appsettings.json", optional: true, reloadOnChange: true)
                .AddJsonFile($"appsettings.{env.EnvironmentName}.json", optional: true)
                .AddJsonFile("/k8s/config/sachaserver-properties", optional: true, reloadOnChange: true)
                .AddJsonFile("/k8s/secrets/sachaserver-secrets-properties", optional: true, reloadOnChange: true)
                .AddEnvironmentVariables();

            Configuration = builder.Build();

            //Set the Static on MyServices, which is very poor design, but it is just for a
            //demo so I am letting it slide
            MyServices.AllVariablesFromStartup = Configuration.AsEnumerable();

            app.UseServiceStack(new AppHost
            {
                AppSettings = new NetCoreAppSettings(Configuration)
            });
        }
    }

    public class AppHost : AppHostBase
    {
       .....
    }
}

The most important lines being these ones where it can be seen that we read from the mapped configmap/secret mounted files

var builder = new ConfigurationBuilder()
    .SetBasePath(env.ContentRootPath)
    .....
	.....
	.AddJsonFile("/k8s/config/sachaserver-properties", optional: true, reloadOnChange: true)
    .AddJsonFile("/k8s/secrets/sachaserver-secrets-properties", optional: true, reloadOnChange: true)
    .AddEnvironmentVariables();

Configuration = builder.Build();

//Set the Static on MyServices, which is very poor design, but it is just for a
//demo so I am letting it slide
MyServices.AllVariablesFromStartup = Configuration.AsEnumerable();


A New Route

Ok so now that we are reading in these file values, we obviously want to ensure it is all working, so lets have a new route to expose all the settings that have been read in by the .NET Core configuration system. Where we are obviously expecting our configmap/secrets items to be part of that.


Since we are using ServiceStack this is what our new route looks like

using ServiceStack;
using System.Collections.Generic;

namespace sswebapp.ServiceModel
{
    [Route("/showsettings","GET")]
    public class ShowSettingRequest : IReturn<ShowSettingResponse>
    {
        
    }

    public class ShowSettingResponse
    {
        public IEnumerable<string> Results { get; set; }
    }
    
}


A New Method To Support The New Route

Ok so we now have a new route, but we need some service code to support this new route. So here we have it

using System;
using System.Collections.Generic;
using System.Text;
using MySql.Data.MySqlClient;
using ServiceStack;
using sswebapp.ServiceModel;

namespace sswebapp.ServiceInterface
{
    public class MyServices : Service
    {
        /// <summary>
        /// Set in <c>sswebapp.Startup.cs</c>. This is just for demo purposes only
        /// this is not a great design, but for this quick and dirty demo it does the job
        /// </summary>
        public static IEnumerable<KeyValuePair<string,string>> AllVariablesFromStartup { get; set; }

		....
		....
		....
		....
		....
		

        public object Get(ShowSettingRequest request)
        {
            try
            {
                var allVars = new List<string>();
                foreach (var kvp in AllVariablesFromStartup)
                {
                    allVars.Add($"Key: {kvp.Key}, Value: {kvp.Value}");
                }

                return new ShowSettingResponse { Results = allVars };
            }
            catch(Exception ex)
            {
                return new ShowSettingResponse { Results = new List<string>() {ex.Message } };
            }
        }
    }
}


Testing It Out

So we have talked about creating the configmap/secrets and how to test them out using our friend, busybox. We have also talked about how we modified the ongoing pod/deployment that this series of post has worked with from the beginning, where we have exposed a new route to allow us to grab all the settings the .NET Core configuration sub system can see.


So we should be in a good position to test it out for real, lets proceed


As usual we expect minikube to be running

c:\
cd\
.\minikube.exe start --kubernetes-version="v1.9.0" --vm-driver="hyperv" --memory=1024 --hyperv-virtual-switch="Minikube Switch" --v=7 --alsologtostderr 

Ok so now lets create the pod/deployment

\kubectl.exe apply -f C:\Users\sacha\Desktop\KubernetesExamples\Post5_SimpleServiceStackPod_ConfigMapsSecrets\sswebapp\deployment.yaml


And then the service

.\kubectl.exe apply -f C:\Users\sacha\Desktop\KubernetesExamples\Post5_SimpleServiceStackPod_ConfigMapsSecrets\sswebapp\service.yaml

Then lets grab the url for the service

.\minikube service simple-sswebapi-service --url 


So for me this would allow me to use this url for the running service, which should show ALL the settings that the ServiceStack app read in when using the new showsettings route, including the Kubernetes configmap/secret values we looked at above


http://192.168.0.29:32383/showsettings?format=json


image


Not the best formatting, I give you that, so lets just take that JSON into http://jsonprettyprint.com/json-pretty-printer.php which tidies it up into this


image


Aha our configmap and secret values are there. Superb its all working. Obviously for the secrets we would still need to decode this from this base64 string to get our original value. But this does show everything is working just fine.


Conclusion

As with most of the post in this series so far, I have found Kubernetes to be most intuitive, and it just kind of works to be honest, this post has been particularly straight forward where I just wrote the YAML for the config map, and then wrote a test busybox pod, and it just worked. Doesn’t happen that often…..so yay

kubernetes

Kubernetes Part 4 of n, Singletons


So this post will build upon services that we looked at last time, and we will look to see how we can use a Service to act as a singleton for something that should be a singleton like a database. Just a reminder the rough outline is as follows:


  1. What is Kubernetes / Installing Minikube
  2. What are pods/labels, declaring your first pod
  3. Services
  4. Singletons, such as a DB (this post)
  5. ConfigMaps/Secrets
  6. LivenessProbe/ReadinessProbe/Scaling Deployments


Where is the code again?


What did we talk about last time?

Last time we talked about services and how they are a constant over a single or group of pods. Services also expose a DNS address which we looked at in the last post. This time we will carry on looking at services but we will tackle how we can set up a singleton such as a database


What are we going to cover?

This time we will build upon what we did in post2 and post3, but we will get the REST API pod/service that we have crafted to work with a single MySQL instance.  If you recall from the last posts that the REST API was ServiceStack which you may or may not be familiar with.
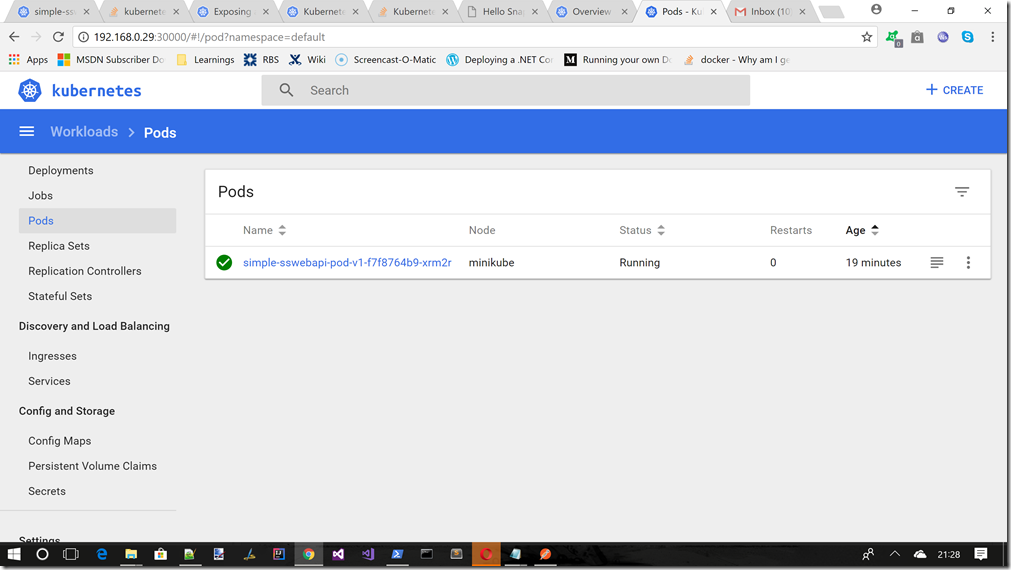
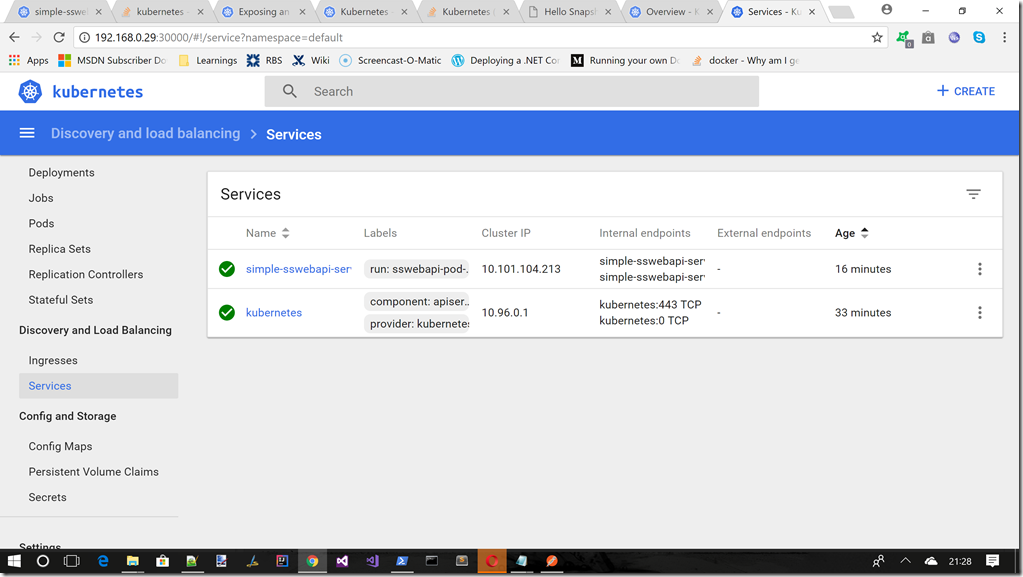
 

Why did I choose MySql?

I chose MySql as it is fairly self contained, can be run as a single pod/service in Kubernetes and its been around for a long time, and has stable Docker images available, and to be honest it’s a nice simple thing to use to demonstrate.


Changes to the ongoing REST API pod that we are working with

The REST API pod we have been working with is all good, nothing changes for the deployment of him from what we did in post2 and post3. However what we want to be able to do is get it to talk to a MySql instance that we will host in another service. So lets look at what changes from last time to enable us to do that shall we.


The first thing we need to do is update the sswebapp.ServiceInterface project to use the MySql instance. We need to update it to include the relevant NuGet package https://www.nuget.org/packages/MySql.Data/6.10.6 which (at the time of writing) was the most up to date .NET driver for MySql


image


So now that we have that in place we just need to create a new route for this MySql stuff.

From the stuff we already had working we had a simple route called “Hello”, which would match a route like this


/hello

/hello/{Name}


That still works, we have not touched that, but we do wish to add another route. The new route will be on that takes the following parameters and is a POST request

Host

Port


image


Here is an example of usage from Postman which is a tool I use a lot for testing out my REST endpoints

image


So now that we have a route declared we need to write some server side code to deal with this route. That is done by adding the following code to the sswebapp.ServiceInterface.MyService.cs code file

using System;
using System.Collections.Generic;
using MySql.Data.MySqlClient;
using ServiceStack;
using sswebapp.ServiceModel;

namespace sswebapp.ServiceInterface
{
    public class MyServices : Service
    {
		//OTHER EXISTING ROUTES HERE SUCH AS
		//Hello/{Name}
		

        public object Post(MySqlRequest request)
        {
            MySqlConnection connection = null;
            try
            {
                var server = request.SqlProps.Host;
                var port = request.SqlProps.Port;
                var uid = "root";
                var password = "password";
                string connectionString = $"server={server};port={port};user={uid};password={password};";

                using (connection = new MySqlConnection(connectionString))
                {
                    connection.Open();
                    var query = @"SELECT table_name, table_schema 
                                FROM INFORMATION_SCHEMA.TABLES 
                                WHERE TABLE_TYPE = 'BASE TABLE';";

                    using (MySqlCommand cmd = new MySqlCommand(query, connection))
                    {
                        //Create a data reader and Execute the command
                        using (MySqlDataReader dataReader = cmd.ExecuteReader())
                        {

                            //Read the data and store them in the list
                            var finalResults = new List<string>();
                            while (dataReader.Read())
                            {
                                finalResults.Add($"Name = '{dataReader["table_name"]}', Schema = '{dataReader["table_schema"]}'");
                            }

                            //close Data Reader
                            dataReader.Close();

                            return new MySqlResponse
                            {
                                Results = finalResults
                            };
                        }
                    }
                }
            }
            catch(Exception ex)
            {
                return new MySqlResponse
                {
                    Results = new List<string>() {  ex.Message  + "\r\n" + ex.StackTrace}
                };
            }
            finally
            {
                if(connection != null)
                {
                    if(connection.State == System.Data.ConnectionState.Open)
                    {
                        connection.Close();
                    }
                }
            }
        }
    }
}


So now we have a route and the above server side code to handle the route. But what exactly does the code above do? Well its quite simple, let break it down into a couple of points


  • We wish to have a MySql service/pod created outside the scope of this service/pod and it would be nice to try and connect to this MySql instance via its DNS name and its IP Address just to ensure both those elements work as expected in Kuberenetes
  • Since we would like to either use the MySql service/pod DNS name or IP Address I thought it made sense to be able to pass that into the REST API request as parameters, and use them to try and connect to the MySql instance. By doing this we just use the same logic above, no matter what the DNS name or IP Address ends up being. The above code will just work as is, we don’t need to change anything. You may say this is not very real world like, which is true, however I am trying to demonstrate concepts at this stage, which is why I am making things more simple/obvious
  • So we use the incoming parameters to establish a connection to the MySql service/pod (which obviously should be running in Kubernetes), and we just try and SELECT some stuff from the default MySql databases, and return that to the user just to show that the connection is working


So that is all we need to change to the existing REST API service/pod we have been working with


The MySql Service/pod

Ok so now that we have our ongoing REST API service/pod modified (and already uploaded to Docker cloud for you : https://hub.docker.com/r/sachabarber/sswebapp-post-4/) we need to turn our attention on how to craft a MySql kubernetes service/pod.


Luckily there is this nice Docker cloud image available to use already : https://hub.docker.com/_/mysql/, so we can certainly start with that.


For the MySql instance to work we will need to be able to store stuff to disk, so the service/pod needs to be stateful, which is something new. To do this we can create a kubernetes deployment for MySql and connect it to an existing PersistentVolume using a PersistentVolumeClaim


Before we begin

Before we start, lets make sure Minikube is running (see post 1 for more details)

cd\
.\minikube.exe start --kubernetes-version="v1.9.0" --vm-driver="hyperv" --memory=1024 --hyperv-virtual-switch="Minikube Switch" --v=7 --alsologtostderr 


Creating the PersistentVolume

So for this post, you can use the mysql\nfs-volume.yaml file to create the PersistentVolume you need, which looks like this


apiVersion: v1
kind: PersistentVolume
metadata:
  name: mysql-volume
  labels:
    volume: my-volume
spec:
  accessModes:
    - ReadWriteOnce
  capacity: 
    storage: 1Gi
  nfs:
    server: 192.169.0.1
    path: "/exports"


And can be deployed like

.\kubectl.exe apply -f C:\Users\sacha\Desktop\KubernetesExamples\Post4_SimpleServiceStackPod_MySQLStatefulService\mysql\nfs-volume.yaml


That will create a PersistentVolume that is 1GB and that can then be used by the service/pod that will run the MySql instance.


Creating the MySql Instance

Lets see how we can create a MySql service/volumeClaim and deployment/pod, we can use the file src\mysql-deployment.yaml to do all this, which looks like this


apiVersion: v1
kind: Service
metadata:
  name: mysql
spec:
  ports:
  - port: 3306
    protocol: TCP
  selector:
    app: mysql
---
apiVersion: v1
kind: PersistentVolumeClaim
metadata:
  name: mysql-pv-claim
spec:
  accessModes:
    - ReadWriteOnce
  resources:
    requests:
      storage: 1Gi
  selector:
    matchLabels:
      volume: my-volumeMounts
---
apiVersion: apps/v1 # for versions before 1.9.0 use apps/v1beta2
kind: Deployment
metadata:
  name: mysql
spec:
  replicas: 1
  selector:
    matchLabels:
      app: mysql
  strategy:
    type: Recreate
  template:
    metadata:
      labels:
        app: mysql
    spec:
      containers:
      - image: mysql:5.6
        name: mysql
        env:
          # Use secret in real usage
        - name: MYSQL_ROOT_PASSWORD
          value: password
        livenessProbe:
          tcpSocket:
            port: 3306
        ports:
        - containerPort: 3306
          name: mysql
        volumeMounts:
        - name: mysql-persistent-storage
          mountPath: /var/lib/mysql
      volumes:
      - name: mysql-persistent-storage
        persistentVolumeClaim:
          claimName: mysql-pv-claim


There are quite a few things to note here, so lets go through them one by one


PersistentVolumeClaim


That’s this part

apiVersion: v1
kind: PersistentVolumeClaim
metadata:
  name: mysql-pv-claim
spec:
  accessModes:
    - ReadWriteOnce
  resources:
    requests:
      storage: 1Gi
  selector:
    matchLabels:
      volume: my-volumeMounts


  • This matches the PersistentVolume we just setup, where we ask for 1GB


In understanding the difference between PersistentVolume and PersistentVolumeClaims, this except from the official docs may help


A PersistentVolume (PV) is a piece of storage in the cluster that has been manually provisioned by an administrator, or dynamically provisioned by Kubernetes using a StorageClass. A PersistentVolumeClaim (PVC) is a request for storage by a user that can be fulfilled by a PV. PersistentVolumes and PersistentVolumeClaims are independent from Pod lifecycles and preserve data through restarting, rescheduling, and even deleting Pods.


https://kubernetes.io/docs/tutorials/stateful-application/mysql-wordpress-persistent-volume/  up on date 19/03/18


Deployment/pod

That’s this part

apiVersion: apps/v1 # for versions before 1.9.0 use apps/v1beta2
kind: Deployment
metadata:
  name: mysql
spec:
  replicas: 1
  selector:
    matchLabels:
      app: mysql
  strategy:
    type: Recreate
  template:
    metadata:
      labels:
        app: mysql
    spec:
      containers:
      - image: mysql:5.6
        name: mysql
        env:
          # Use secret in real usage
        - name: MYSQL_ROOT_PASSWORD
          value: password
        livenessProbe:
          tcpSocket:
            port: 3306
        ports:
        - containerPort: 3306
          name: mysql
        volumeMounts:
        - name: mysql-persistent-storage
          mountPath: /var/lib/mysql
      volumes:
      - name: mysql-persistent-storage
        persistentVolumeClaim:
          claimName: mysql-pv-claim


Ok so moving on, lets looks at the deployment itself this is the most complex part

  • We use the mysql:5.6 image to create then pod
  • We set the root level MySql password to “password” (relax this is just a demo, in one of the next posts I will show you how to use Kubernetes secrets)
  • We expose a livenessProbe to match the MySql port of 3306 (a future post will cover this)
  • We expose the standard MySql port of 3306
  • We set up the VolumeMounts that has a mount path
  • We set up the PersistentVolumeClaim to use the PersistentVolumeClaim  we created already


The MySql service

That’s this part

apiVersion: v1
kind: Service
metadata:
  name: mysql
spec:
  ports:
  - port: 3306
    protocol: TCP
  selector:
    app: mysql

Which I think is fairly self explanatory


So what about the REST API service/deployment/pod?

So we have talked about what changes we had to make to ensure that the REST API could talk to a MySql instance running in Kubernetes,but we have not talked about how we run this modified REST API in kubernetes. luckily this has not really changed since last time, we just do this


c:\
cd\
.\kubectl run simple-sswebapi-pod-v1 --replicas=1 --labels="run=sswebapi-pod-v1" --image=sachabarber/sswebapp-post-4:v1  --port=5000
.\kubectl expose deployment simple-sswebapi-pod-v1 --type=NodePort --name=simple-sswebapi-service
.\kubectl get services simple-sswebapi-service
.\minikube service simple-sswebapi-service --url 


So now that we have done all that, let’s check our services are there

image


Ok so now lets use the trick of using busybox to check out the DNS name for the running MySql instance, such that we can use it to provide to the new REST API endpoint


.\kubectl run -i --tty busybox --image=busybox --restart=Never

Then we can do something like

nslookup mysql

Which should give us something like this

image

Ok so putting this all together we should be able to hit our modified REST API endpoint to test this MySql instance using this DNS name. Lets see that

This is what we see using Postman

image

Woohoo, we get a nice 200 Ok (that’s nice), and this is the full JSON response we got

{
    "results": [
        "Name = 'columns_priv', Schema = 'mysql'",
        "Name = 'db', Schema = 'mysql'",
        "Name = 'event', Schema = 'mysql'",
        "Name = 'func', Schema = 'mysql'",
        "Name = 'general_log', Schema = 'mysql'",
        "Name = 'help_category', Schema = 'mysql'",
        "Name = 'help_keyword', Schema = 'mysql'",
        "Name = 'help_relation', Schema = 'mysql'",
        "Name = 'help_topic', Schema = 'mysql'",
        "Name = 'innodb_index_stats', Schema = 'mysql'",
        "Name = 'innodb_table_stats', Schema = 'mysql'",
        "Name = 'ndb_binlog_index', Schema = 'mysql'",
        "Name = 'plugin', Schema = 'mysql'",
        "Name = 'proc', Schema = 'mysql'",
        "Name = 'procs_priv', Schema = 'mysql'",
        "Name = 'proxies_priv', Schema = 'mysql'",
        "Name = 'servers', Schema = 'mysql'",
        "Name = 'slave_master_info', Schema = 'mysql'",
        "Name = 'slave_relay_log_info', Schema = 'mysql'",
        "Name = 'slave_worker_info', Schema = 'mysql'",
        "Name = 'slow_log', Schema = 'mysql'",
        "Name = 'tables_priv', Schema = 'mysql'",
        "Name = 'time_zone', Schema = 'mysql'",
        "Name = 'time_zone_leap_second', Schema = 'mysql'",
        "Name = 'time_zone_name', Schema = 'mysql'",
        "Name = 'time_zone_transition', Schema = 'mysql'",
        "Name = 'time_zone_transition_type', Schema = 'mysql'",
        "Name = 'user', Schema = 'mysql'",
        "Name = 'accounts', Schema = 'performance_schema'",
        "Name = 'cond_instances', Schema = 'performance_schema'",
        "Name = 'events_stages_current', Schema = 'performance_schema'",
        "Name = 'events_stages_history', Schema = 'performance_schema'",
        "Name = 'events_stages_history_long', Schema = 'performance_schema'",
        "Name = 'events_stages_summary_by_account_by_event_name', Schema = 'performance_schema'",
        "Name = 'events_stages_summary_by_host_by_event_name', Schema = 'performance_schema'",
        "Name = 'events_stages_summary_by_thread_by_event_name', Schema = 'performance_schema'",
        "Name = 'events_stages_summary_by_user_by_event_name', Schema = 'performance_schema'",
        "Name = 'events_stages_summary_global_by_event_name', Schema = 'performance_schema'",
        "Name = 'events_statements_current', Schema = 'performance_schema'",
        "Name = 'events_statements_history', Schema = 'performance_schema'",
        "Name = 'events_statements_history_long', Schema = 'performance_schema'",
        "Name = 'events_statements_summary_by_account_by_event_name', Schema = 'performance_schema'",
        "Name = 'events_statements_summary_by_digest', Schema = 'performance_schema'",
        "Name = 'events_statements_summary_by_host_by_event_name', Schema = 'performance_schema'",
        "Name = 'events_statements_summary_by_thread_by_event_name', Schema = 'performance_schema'",
        "Name = 'events_statements_summary_by_user_by_event_name', Schema = 'performance_schema'",
        "Name = 'events_statements_summary_global_by_event_name', Schema = 'performance_schema'",
        "Name = 'events_waits_current', Schema = 'performance_schema'",
        "Name = 'events_waits_history', Schema = 'performance_schema'",
        "Name = 'events_waits_history_long', Schema = 'performance_schema'",
        "Name = 'events_waits_summary_by_account_by_event_name', Schema = 'performance_schema'",
        "Name = 'events_waits_summary_by_host_by_event_name', Schema = 'performance_schema'",
        "Name = 'events_waits_summary_by_instance', Schema = 'performance_schema'",
        "Name = 'events_waits_summary_by_thread_by_event_name', Schema = 'performance_schema'",
        "Name = 'events_waits_summary_by_user_by_event_name', Schema = 'performance_schema'",
        "Name = 'events_waits_summary_global_by_event_name', Schema = 'performance_schema'",
        "Name = 'file_instances', Schema = 'performance_schema'",
        "Name = 'file_summary_by_event_name', Schema = 'performance_schema'",
        "Name = 'file_summary_by_instance', Schema = 'performance_schema'",
        "Name = 'host_cache', Schema = 'performance_schema'",
        "Name = 'hosts', Schema = 'performance_schema'",
        "Name = 'mutex_instances', Schema = 'performance_schema'",
        "Name = 'objects_summary_global_by_type', Schema = 'performance_schema'",
        "Name = 'performance_timers', Schema = 'performance_schema'",
        "Name = 'rwlock_instances', Schema = 'performance_schema'",
        "Name = 'session_account_connect_attrs', Schema = 'performance_schema'",
        "Name = 'session_connect_attrs', Schema = 'performance_schema'",
        "Name = 'setup_actors', Schema = 'performance_schema'",
        "Name = 'setup_consumers', Schema = 'performance_schema'",
        "Name = 'setup_instruments', Schema = 'performance_schema'",
        "Name = 'setup_objects', Schema = 'performance_schema'",
        "Name = 'setup_timers', Schema = 'performance_schema'",
        "Name = 'socket_instances', Schema = 'performance_schema'",
        "Name = 'socket_summary_by_event_name', Schema = 'performance_schema'",
        "Name = 'socket_summary_by_instance', Schema = 'performance_schema'",
        "Name = 'table_io_waits_summary_by_index_usage', Schema = 'performance_schema'",
        "Name = 'table_io_waits_summary_by_table', Schema = 'performance_schema'",
        "Name = 'table_lock_waits_summary_by_table', Schema = 'performance_schema'",
        "Name = 'threads', Schema = 'performance_schema'",
        "Name = 'users', Schema = 'performance_schema'"
    ]
}

Very nice looks like its working.


ClusterIP:None : A bit better

Whilst the above is very cool, we can go one better, and use everything the same as above with the exception of the service part of the src\mysql-deployment.yaml file, which we would now use like this

apiVersion: v1
kind: Service
metadata:
  name: mysql
spec:
  ports:
  - port: 3306
    protocol: TCP
  selector:
    app: mysql
  clusterIP: None

See how we are using clusterIP:None. The Service option clusterIP:None lets the Service DNS name resolve directly to the Pod’s IP address. This is optimal when you have only one Pod behind a Service and you don’t intend to increase the number of Pods. This allows us to hit the SQL instance just like this

image


Where you can use the dashboard (or command line to find the endpoints)

image


That’s pretty cool huh, no crazy long DNS name to deal with, “mysql” just rolls of the tongue a bit easier than “mysql.default.svc.cluster.local” (well in my opinion it does anyway)


Conclusion

Again Kubernetes has proven itself to be more than capable of doing what we want, and exposing one service to another, and we did not need to use the inferior technique of using Environment Variables or anything, we were able to just use DNS to resolve the MySql instance. This is way better than Links in Docker, I like it a whole lot more, as I can control my different deployments and they can discover each other using DNS. In Docker (I could be wrong here though) this would all need to be done in a single Docker compose file.

kubernetes

Kubernetes Part 3 of n, Services

So this will be a shorter post than most of the others in this series, this time we will be covering services. The rough road map is as follows:


  1. What is Kubernetes / Installing Minikube
  2. What are pods/labels, declaring your first pod 
  3. Services (this post)
  4. Singletons (such as a DB)
  5. ConfigMaps/Secrets
  6. LivenessProbe/ReadinessProbe/Scaling Deployments


Although this post is not going to be a very long one do not underestimate the importance of “Services” in kubernetes.


So Just What Is A Service?

So before we go into what a service is lets just discuss PODs a bit. A POD is the lowest unit of deployment in Kubenetes. PODs are ephemeral, that is they are intended to die and may be restarted if they are deemed unhealthy. So with all this happening how could we really expose an IP Address/DNS name of something to another POD if it is such a possible state of flux and may be recreated at any time?


Services are the answer to this question. Services provide an abstraction over a single POD or group of pods that match a label selector. Services unlike PODs are supposed to live a VERY long time. Their IP address/DNS name and associated environment variables do not disappear or change until the service itself is deleted.


Here is an example we have a requirement to do some image processing which could all be done in parallel, we don’t care what POD picks this work up, providing we can reach a POD. This is something that a service will give you, where you would specify a label selector such that it can match the PODs for that label. These PODs will then have their endpoints associated with the service.


Lets try and visualize this using a diagram or 2


image


image


From this diagram we can see that we had 2 deployments labeller app=A/app=B and we exposed the PODs that run in these deployments using 2 services where we use the app=A/app=B label selectors. So you can see above that we have ended up with 3 PODS that matched app=B in one service and just one POD that matched app=A in the other service.


The cool thing about services is that they are always watching for new PODs, so if you did one of the following the service would end up knowing about it

  • Scale the number of PODS either using a ReplicationController or Deployment (the Service would see the new nodes or know which ones to remove)
  • Change the labels associated with a POD in some way which means it should NOW be included as a POD by the service, or should be removed from the Service as the labels no longer match the services POD selection criteria. This one is particularly powerful, as we can have some PODs that are exposed to a service that are running fine, then we can create a new deployment and add a new label say version=2, and can alter the Service selector to only pick up PODs that are NOW version=2 labelled. Then when we are happy we can remove the old PODs. This is pretty awesome and we will be discussing this more in a future post


What Did The Example Service Look Like Again?

Lets just remind ourselves of what the service looked like for the last post


And here is the code : https://github.com/sachabarber/KubernetesExamples


And here is the Docker Cloud repo we used last time that we can still use for this post : https://hub.docker.com/r/sachabarber/sswebapp/


We used this to create the deployment and expose the service

kubectl run simple-sswebapi-pod-v1 --replicas=1 --labels="run=sswebapi-pod-v1" --image=sachabarber/sswebapp:v1  --port=5000
kubectl expose deployment simple-sswebapi-pod-v1 --type=NodePort --name=simple-sswebapi-service


or via YAML


Deployment

kubectl.exe apply -f C:\Users\sacha\Desktop\KubernetesExamples\Post2_SimpleServiceStackPod\sswebapp\deployment.yaml


Where the YAML looks like this, note those labels

apiVersion: extensions/v1beta1
kind: Deployment
metadata:
  name: simple-sswebapi-pod-v1
spec:
  replicas: 1
  template:
    metadata:
      labels:
        app: run=sswebapi-pod-v1
    spec:
      containers:
      - name: sswebapi-pod-v1
        image: sachabarber/sswebapp:v1
        ports:
        - containerPort: 5000


Service

kubectl.exe apply -f C:\Users\sacha\Desktop\KubernetesExamples\Post2_SimpleServiceStackPod\sswebapp\service.yaml


Where the YAML looks like this, note the selector, see how it matches the POD labels section


apiVersion: v1
kind: Service
metadata:
  name: simple-sswebapi-service
spec:
  selector:
    app: run=sswebapi-pod-v1
  ports:
  - protocol: TCP
    port: 5000
    targetPort: 5000
  type: NodePort


In the above example I am using type:NodePort. This means that this service will be exposed on each node in the Kubernetes cluster. We can get the bits of information we want using these command lines


Grab the single node IP address for Minikube cluster

.\minikube.exe ip


Which gives us this

image


Grab the single node IP address for Minikube cluster

.\kubectl describe service simple-sswebapi-service


Which gives us this


image


So we can now try and hit the full service exposes port like so


image


That is one type of Service type, we will talk about them all below in more detail, but this proves its working

Types Of Service

For some parts of your application (e.g. frontends) you may want to expose a Service onto an external (outside of your cluster) IP address.

Kubernetes ServiceTypes allow you to specify what kind of service you want. The default is ClusterIP.

Type values and their behaviors are:


  • ClusterIP: Exposes the service on a cluster-internal IP. Choosing this value makes the service only reachable from within the cluster. This is the default ServiceType.
  • NodePort: Exposes the service on each Node’s IP at a static port (the NodePort). A ClusterIP service, to which the NodePort service will route, is automatically created. You’ll be able to contact the NodePort service, from outside the cluster, by requesting <NodeIP>:<NodePort>.
  • LoadBalancer: Exposes the service externally using a cloud provider’s load balancer. NodePort and ClusterIP services, to which the external load balancer will route, are automatically created.
  • ExternalName: Maps the service to the contents of the externalName field (e.g. foo.bar.example.com), by returning a CNAME record with its value. No proxying of any kind is set up. This requires version 1.7 or higher of kube-dns.


Taken from https://kubernetes.io/docs/concepts/services-networking/service/#publishing-services—service-types up on date 05/03/18


Environment Variables


When a Pod is run on a Node, the kubelet adds a set of environment variables for each active Service. It supports both Docker links compatible variables (see makeLinkVariables) and simpler {SVCNAME}_SERVICE_HOST and {SVCNAME}_SERVICE_PORT variables, where the Service name is upper-cased and dashes are converted to underscores.

For example, the Service “redis-master” which exposes TCP port 6379 and has been allocated cluster IP address 10.0.0.11 produces the following environment variables:

REDIS_MASTER_SERVICE_HOST=10.0.0.11
REDIS_MASTER_SERVICE_PORT=6379
REDIS_MASTER_PORT=tcp://10.0.0.11:6379
REDIS_MASTER_PORT_6379_TCP=tcp://10.0.0.11:6379
REDIS_MASTER_PORT_6379_TCP_PROTO=tcp
REDIS_MASTER_PORT_6379_TCP_PORT=6379
REDIS_MASTER_PORT_6379_TCP_ADDR=10.0.0.11


This does imply an ordering requirement – any Service that a Pod wants to access must be created before the Pod itself, or else the environment variables will not be populated. DNS does not have this restriction


Taken from https://kubernetes.io/docs/concepts/services-networking/service/#environment-variables up on date 02/03/18


Lets try this for the code that goes with this post, I am assuming that you had recreated the PODs/Deployment after the service was created (as the environment variables can only be injected into PODs AFTER the service is created as just stated above). This may mean for this post that we are delete the deployment we initially created and create it again after the service is up and running


We can use this command line to get ALL the pods


.\kubectl.exe get pods


Which will then give us something like this for this POD we have used so far


image


So now lets see what happens when we examine this POD for its environment variables (remember this is after the service has been created for the deployment and I have recreated the deployment once or twice to ensure that the environment variables ARE NOW available)


.\kubectl.exe exec simple-sswebapi-pod-v1-f7f8764b9-xs822 env

Which for this POD (currently in this post we have only ever asked for 1 replica set, so we have only ever got this single POD too) gives us the following environment variables, and of which we could use in our code.


image

You can see that we ran this command in the context of the demo POD that we are working with, yet that POD can see environment variables from all the different services that are currently available (or where running when the demo POD was created at any rate)


Obviously we would have to deal with the fact that these are NOT available to PODs UNTIL the service is created. These env variables may serve you well for say, having a service over one set of PODS and then having another service/PODs that might way to use the 1st service, that would work, as the 1st service would hopefully be running before we start the 2nd service/PODs.


None the less DNS is a better option. We will look at that next


DNS

An optional (though strongly recommended) cluster add-on is a DNS server. The DNS server watches the Kubernetes API for new Services and creates a set of DNS records for each. If DNS has been enabled throughout the cluster then all Pods should be able to do name resolution of Services automatically.

For example, if you have a Service called “my-service” in Kubernetes Namespace “my-ns” a DNS record for “my-service.my-ns” is created. Pods which exist in the “my-ns” Namespace should be able to find it by simply doing a name lookup for “my-service“. Pods which exist in other Namespaces must qualify the name as “my-service.my-ns“. The result of these name lookups is the cluster IP.

Kubernetes also supports DNS SRV (service) records for named ports. If the “my-service.my-nsService has a port named “http” with protocol TCP, you can do a DNS SRV query for “_http._tcp.my-service.my-ns” to discover the port number for “http“.


The Kubernetes DNS server is the only way to access services of type ExternalName.


Taken from https://kubernetes.io/docs/concepts/services-networking/service/#environment-variables up on date 02/03/18


So above where we were talking about environment variables, we talked about the fact that when you create a new service and have some PODs created afterwards the service will inject environment variables into PODs. However we also talked about the fact that the PODs need to started after the service in order to receive the correct environment variables. This is a bit of a limitation, which is solved by DNS.


Kubenetes runs a special DNS POD called kube-dns, this is made available thanks to a Kubernetes addon called DNS


You can check that the addon is installed like this

.\minikube addons list

Which should show something like this

enter image description here


So now that we know we have the DNS addon running how do we see if we have the kube-dns pod running? Well we can simply do this

.\kubectl get pod -n kube-system

Which should show something like this

enter image description here

So now that we have the DNS stuff and we know its running just how do we use it. Essentially what we would like to do is confirm that the DNS lookups within the cluster.. Ideally we would like to get a DNS nslookup command to run directly in the demo container. The demo container in this case is a simple .NET Core REST API, so it won’t have anything more than that. At first I could not see how to do this, but I asked a few dumb questions on stack overflow, and then it came to me, all the demos of using DNS nslookup in Kubernetes that I had seen seemed to use busybox


What is BusyBox you ask?

Coming in somewhere between 1 and 5 Mb in on-disk size (depending on the variant), BusyBox is a very good ingredient to craft space-efficient distributions.

BusyBox combines tiny versions of many common UNIX utilities into a single small executable. It provides replacements for most of the utilities you usually find in GNU fileutils, shellutils, etc. The utilities in BusyBox generally have fewer options than their full-featured GNU cousins; however, the options that are included provide the expected functionality and behave very much like their GNU counterparts. BusyBox provides a fairly complete environment for any small or embedded system.


Taken from https://hub.docker.com/_/busybox/ up on date 02/03/18


Ok great how does that help us? Well what we can now do is just run the BusyBox docker hub image as a POD and use that POD to run our nslookup inside of to see if DNS lookups within the cluster are working.


Here is how to run the BusyBox docker hub image as  a POD

.\kubectl run -i --tty busybox --image=busybox --restart=Never

This will run and give us a command prompt, then we can do this to test the DNS for our demo service that goes with this post, like so

nslookup simple-sswebapi-service

Which gives us this

enter image description here


Cool, so we should be able to use these DNS names or IP address from within the cluster. Nice


Conclusion

So there you go, this was a shorter post than some of the other will be, but I hope you can see just why you need the service abstraction and why it it such as useful construct. Services have one more trick up their sleeve which we will be looking at in the next post

kubernetes

Kubernetes – Part 2 of n, creating our first POD

So it has taken me a while to do this post,so apologies on that front. Anyway if you recall from the 1st article in this series of posts this was the rough agenda


  1. What is Kubernetes / Installing Minikube
  2. What are pods/labels, declaring your first pod  (this post)
  3. Services
  4. Singletons (such as a DB)
  5. ConfigMaps/Secrets
  6. LivenessProbe/ReadinessProbe/Scaling Deployments


So as you can see above this post will talk about PODs in Kubernetes. So lets jump straight in


What Is a POD?

Here is the official blurb from the Kubernetes web site

A pod (as in a pod of whales or pea pod) is a group of one or more containers (such as Docker containers), with shared storage/network, and a specification for how to run the containers. A pod’s contents are always co-located and co-scheduled, and run in a shared context. A pod models an application-specific “logical host” – it contains one or more application containers which are relatively tightly coupled — in a pre-container world, they would have executed on the same physical or virtual machine.

While Kubernetes supports more container runtimes than just Docker, Docker is the most commonly known runtime, and it helps to describe pods in Docker terms.

The shared context of a pod is a set of Linux namespaces, cgroups, and potentially other facets of isolation – the same things that isolate a Docker container. Within a pod’s context, the individual applications may have further sub-isolations applied.

Containers within a pod share an IP address and port space, and can find each other via localhost. They can also communicate with each other using standard inter-process communications like SystemV semaphores or POSIX shared memory. Containers in different pods have distinct IP addresses and can not communicate by IPC without special configuration. These containers usually communicate with each other via Pod IP addresses.

Applications within a pod also have access to shared volumes, which are defined as part of a pod and are made available to be mounted into each application’s filesystem.

In terms of Docker constructs, a pod is modelled as a group of Docker containers with shared namespaces and shared volumes.

Like individual application containers, pods are considered to be relatively ephemeral (rather than durable) entities. As discussed in life of a pod, pods are created, assigned a unique ID (UID), and scheduled to nodes where they remain until termination (according to restart policy) or deletion. If a node dies, the pods scheduled to that node are scheduled for deletion, after a timeout period. A given pod (as defined by a UID) is not “rescheduled” to a new node; instead, it can be replaced by an identical pod, with even the same name if desired, but with a new UID (see replication controller for more details). (In the future, a higher-level API may support pod migration.)

When something is said to have the same lifetime as a pod, such as a volume, that means that it exists as long as that pod (with that UID) exists. If that pod is deleted for any reason, even if an identical replacement is created, the related thing (e.g. volume) is also destroyed and created anew.


image


A multi-container pod that contains a file puller and a web server that uses a persistent volume for shared storage between the containers.


Taken from https://kubernetes.io/docs/concepts/workloads/pods/pod/#what-is-a-pod up on date 16/01/18


Ok so that’s the official low down. So what can we extract from the above paragraph that will help us understand a bit more about how to get what a POD is, and how we can create our own ones?

  • PODs can run one or more things (in containers)
  • It supports multiple container providers but everyone mainly uses Docker
  • PODs seem to be lowest building block in the Kubernetes echo-system


Alright, so now that we know that, we can get to work with some of this. What we can do is think up a simple demo app that would allow us to exercise some (though not all, you will have to learn some stuff on your own dime) of the Kubernetes features.


  • A simple web API is actually quite a good choice as it usually exposes a external façade that can be called (REST endpoint say), and it is also easy to use to demonstrate some more advanced Kubenetes topics such as
    • Services
    • Deployments
    • Replication Sets
    • Health Checks


The Service Stack REST API

So for this series of posts we will be working with a small Service Stack REST API that we will expand over time. For this post, the ServiceStack endpoint simple allows this single route

  • Simple GET : http:[IP_ADD]:5000/hello/{SomeStringValueOfYourChoice}


In that route the [IP_ADD] is of much interest. This will ultimately be coming from Kubenetes. Which will get to by the end of this post.


Where Is It’s Code?

The code for this one will be available here : https://github.com/sachabarber/KubernetesExamples/tree/master/Post2_SimpleServiceStackPod/sswebapp


I think my rough plan at this moment in time is to create a new folder for each post, even though the underlying code base will not be changing that much. That way we can create a new Docker image from each posts code quite easily where we can tag it with a version and either push it DockerHub or a private docker repository (we will talk about this in more detail later)


For now just understand that one post = one folder in git, and this will probably end up being 1 tagged verion of a Docker image (if you don’t know what that means don’t worry we will cover more of that later too)


So What Does The ServiceStack API Look Like?


Well it is a standard ServiceStack .NET Core API project (which I created using the ServiceStack CLI tools). The rough shape of it is as follows


image


  • sswebapp = The actual app
  • sswebapp.ServiceInterface = The service contract
  • sswebapp.ServiceModel = The shared contracts
  • sswebapp.Tests = Some simple tests


I don’t think there is that much merit in walking through all this code. I guess the only one call out I would make with ServiceStack is that it uses a Message based approach rather than a traditional URL/Route based approach. You can still have routing but it’s a secondary concern that is overriden by the type of message being the real decided in what code gets called based on the payload sent.


For this posts demo app this is the only available route


using ServiceStack;

namespace sswebapp.ServiceModel
{
    [Route("/hello")]
    [Route("/hello/{Name}")]
    public class Hello : IReturn<HelloResponse>
    {
        public string Name { get; set; }
    }

    public class HelloResponse
    {
        public string Result { get; set; }
    }
}


This would equate to the following route GET : http:[IP_ADD]:5000/hello/{SomeStringValueOfYourChoice} where the {SomeStringValueOfYourChoice} would be fed into the Name property of the Hello object shown above


The Docker File

Obviously since we know we need an image for Kubernetes to work properly, we need to create one. As we now know Kubernetes can work with many different container providers, but it does has a bias towards Docker. So we need to Docker’ize the above .NET Core Service Stack API example. How do we do that?


Well that part is actually quite simple, we just need to create a Docker file. So without further ado lets have a look at the Dockerfile for this demo code above


FROM microsoft/aspnetcore-build:2.0 AS build-env
COPY src /app
WORKDIR /app

RUN dotnet restore --configfile ./NuGet.Config
RUN dotnet publish -c Release -o out

# Build runtime image
FROM microsoft/aspnetcore:2.0
WORKDIR /app
COPY --from=build-env /app/sswebapp/out .
ENV ASPNETCORE_URLS http://*:5000
ENTRYPOINT ["dotnet", "sswebapp.dll"]


These are main points from the above:

  • We use microsoft/aspnetcore-build:2.0 as the base image
  • We are then able to use the dotnet command to do a few things
  • We then bring in another later microsoft/aspnetcore
  • Before finally adding our own code as the final layer for Docker
  • We then specify port (annpyingly the Kestrel webserver that comes with .NET Core is only port 5000, which is also by some strange act of fate the port that a Docker private repo wants to use….but more on this later), for now we just want to expose the port and specify the start up entry point


MiniKube Setup Using DockerHub


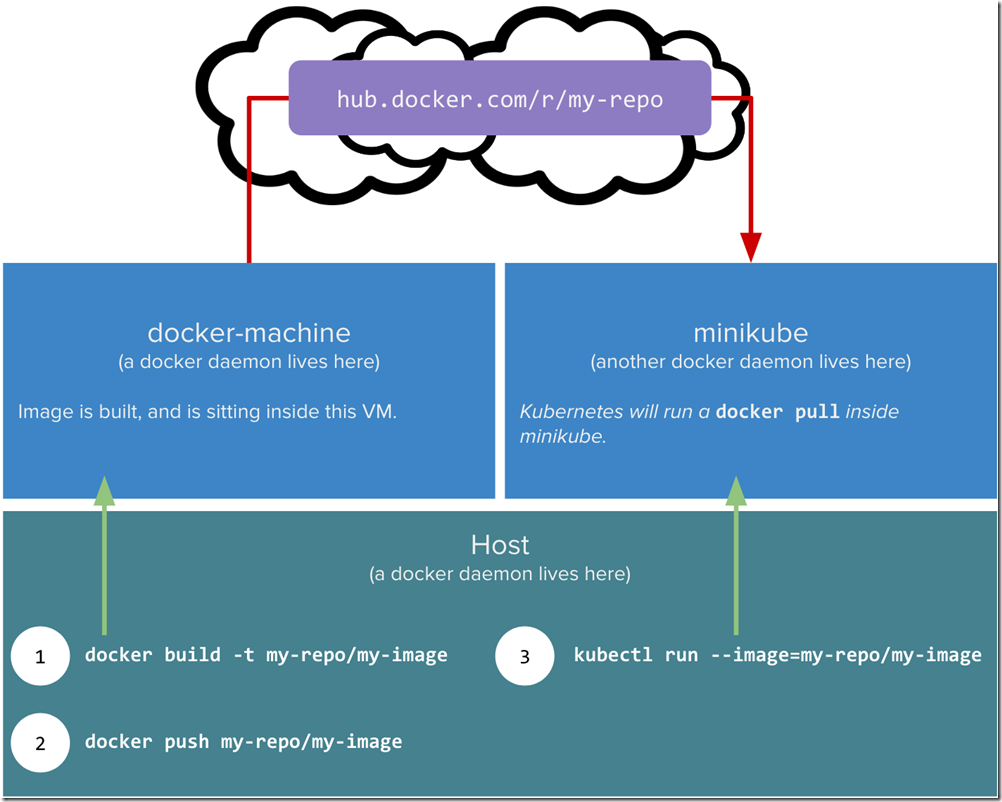
For this section I am using the most friction free way of testing out minikube + Docker images. I am using Docker Cloud to host my repo/images. This is the workflow for this section


image


Image taken from https://blog.hasura.io/sharing-a-local-registry-for-minikube-37c7240d0615 up on date 19/02/18


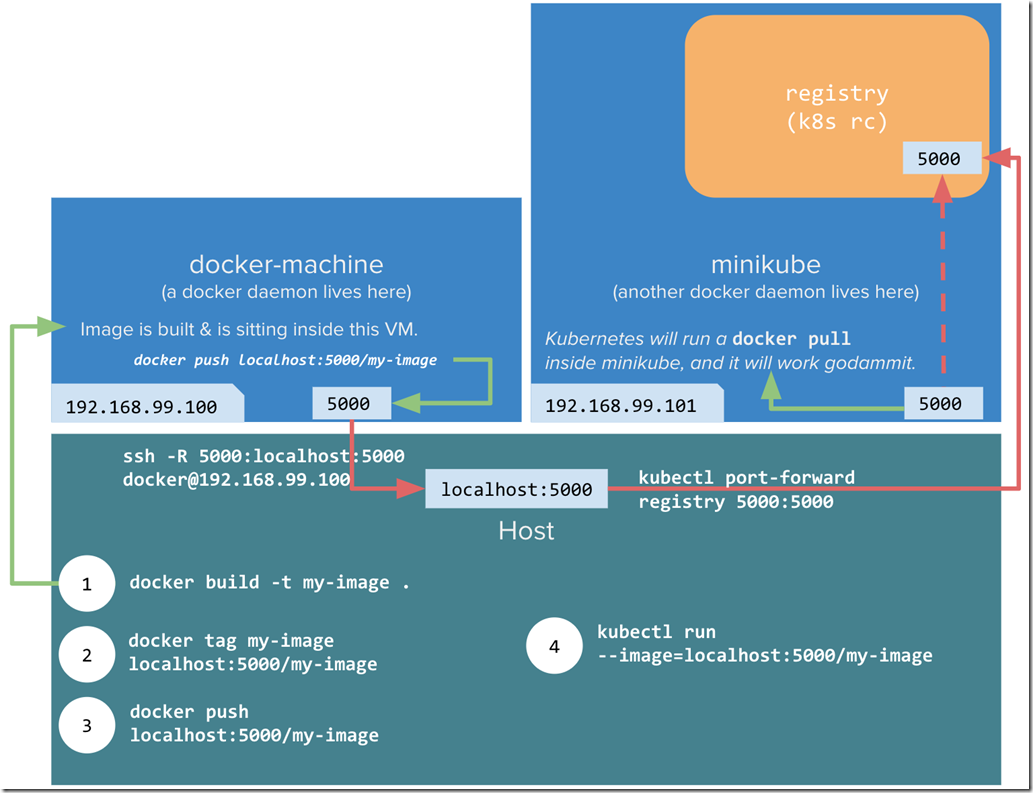
The obvioulsy issue here is that we have a bit of software locally we want to package up into a Docker image and use in MiniKube which is also on our local box. However the Docker daemon in MiniKube is not the same one as outside of MiniKube. Remember MiniKube is in effect a VM that just runs headless. There is also more complication where by MiniKube will want to try and pull images, and may require security credentials. We can work around with this by creating a private docker repo (which I will not use in this series but do talk about below). The article linked above and the other one which I mention at the bottom are MUST reads if you want to do that with MiniKube. I did get it working, but however opted for a simple life and will be using DockerHub to store all my images/repos for this article series.


Ok now that we have a DockerFile and we have decided to use DockerHub to host the repo/image, how do we get this to work in Kubernetes?


Pushing To DockerHub

So the first thing you will need to do is create a DockerHub account, and then create a PUBLIC repo. For me the repo was called “sswebapp” and my DockerHub user is ”sachabarber”. So this is what it looks like in DockerHub after creating the repo


image


Ok with that now in place we need to get the actual Docker image up to DockerHub. How do we do that part?

These are the steps (obviously your paths may be different)

docker login --username=sachabarber
cd C:\Users\sacha\Desktop\KubernetesExamples\Post2_SimpleServiceStackPod\sswebapp
docker build -t "sswebapp:v1" .
docker tag sswebapp:v1 sachabarber/sswebapp:v1
docker push sachabarber/sswebapp


Ok so with now in place all we need to do is take care of the Kubernetes side of things now


Running A DockerHub Image In Kubernetes

So we now have a DockerHub image available, we now need to get Kubernetes to use that image. With Kubenetes there is a basic set of Kubectl commands that cover most of the basics, and then if that is not good enough you can specify most things in YAML files.


We will start out with Kubectl commands and then have a look at what the equivalent YAML would have been


So this is how we can create a POD which must be exposed via something called a service, which for now just trust me you need. We will be getting on to these in a future post.


c:\
cd\
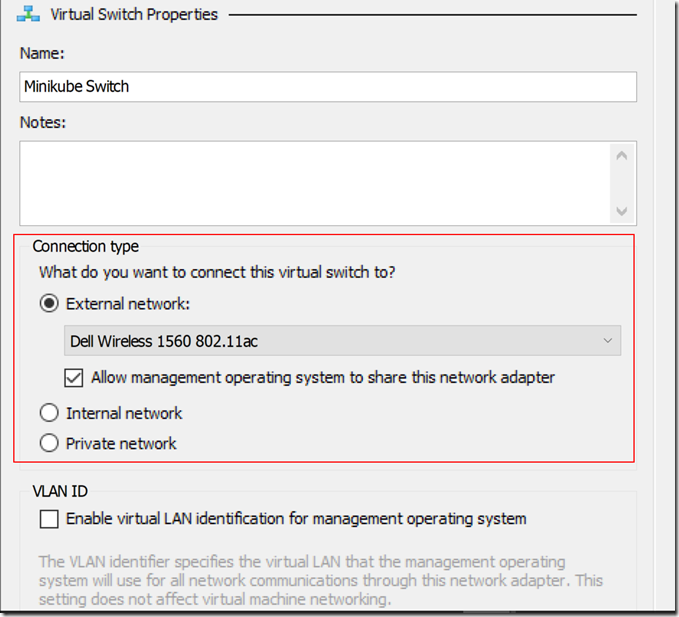
minikube.exe start --kubernetes-version="v1.9.0" --vm-driver="hyperv" --memory=1024 --hyperv-virtual-switch="Minikube Switch" --v=7 --alsologtostderr 
kubectl run simple-sswebapi-pod-v1 --replicas=1 --labels="run=sswebapi-pod-v1" --image=sachabarber/sswebapp:v1  --port=5000
kubectl expose deployment simple-sswebapi-pod-v1 --type=NodePort --name=simple-sswebapi-service
kubectl get services simple-sswebapi-service
minikube service simple-sswebapi-service --url 


So what exactly is going on in there? Well there are a few things of note:

  • We are starting minikube up
  • We use Kubectl to run a new deployment (this is our POD that makes use of our DockerHub image) and we also expose a port at this time
  • We use Kubectl to expose the deployment via a service (future posts will cover this)
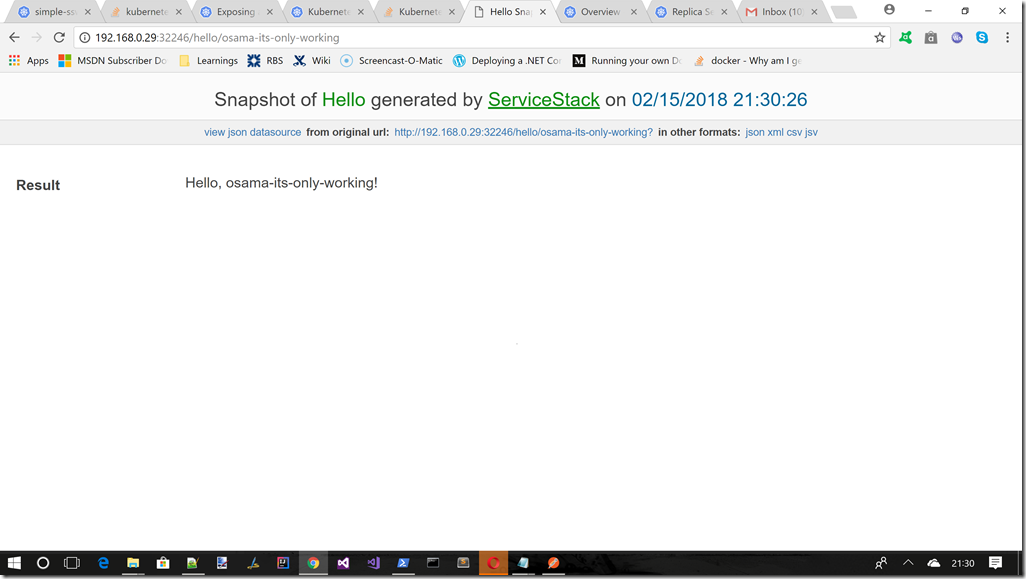
  • We then get our new service grab the external Url from it using the “—url” flag, and then we can try it in a browser


What Would All This Look Like In YAML?

So above we saw 2 lines that create the deployment and one that creates a service. I also mentioned that the Kubctl.exe command line will get you most of the way there for basics, but for more sophisticated stuff we need to use YAML to describe the requirements.


Lets have a look at what the Deployment / Service would look like in YAML.


Here is the Deployment

using command line

kubectl run simple-sswebapi-pod-v1 --replicas=1 --labels="run=sswebapi-pod-v1" --image=sachabarber/sswebapp:v1  --port=5000


And here is the YAML equivalent

apiVersion: extensions/v1beta1
kind: Deployment
metadata:
  name: simple-sswebapi-pod-v1
spec:
  replicas: 1
  template:
    metadata:
      labels:
        app: run=sswebapi-pod-v1
    spec:
      containers:
      - name: sswebapi-pod-v1
        image: sachabarber/sswebapp:v1
        ports:
        - containerPort: 5000


Here is the Service

using command line

kubectl expose deployment simple-sswebapi-pod-v1 --type=NodePort --name=simple-sswebapi-service

And here is the YAML equivalent

apiVersion: v1
kind: Service
metadata:
  name: simple-sswebapi-service
spec:
  selector:
    app: run=sswebapi-pod-v1
  ports:
  - protocol: TCP
    port: 5000
    targetPort: 5000
  type: NodePort


When you use YAML files these must be applied as follows:

kubectl apply -f <FILENAME>


Now that we have all the stuff in place, and deployed we should be able to try things out. Lets do that now.


Importance Of Labels

Labels in Kubernetes play a vital role, in that they allow other higher level abstractions, to quickly locate PODs for things like

  • Exposing via a service
  • Routing
  • Replica sets checks
  • Health checks
  • Rolling upgrades


All of these higher level abstractions are looking for things based on a  particular version. Labels also come with selector support, that allows Kubernetes to identify the right PODs for an action. This is an important concept are you would do well to read the official docs on this : https://kubernetes.io/docs/concepts/overview/working-with-objects/labels/


Pod in dashboard

If we ran the command c:\minikube dashboard, and moved to the Pods section we should now see this


image


Service in dashboard

If we ran the command c:\minikube dashboard, and moved to the Services section we should now see this


image


Testing the endpoint from a browser

If we ran the command c:\minikube service simple-sswebapi-service –url, and took a note of whatever IP address it gave us we can test the deployment via a browser windows, something like the following


image


Declarative Nature Of Kubernetes

One of the best things about Kubenetes in my opinion is that is is declarative in nature, not imperative. This is great as I can just say things like replicas: 4. I don’t have to do anything else and Kubernetes will just ensure that this agreement is met. We will see more of this in later posts, but for now just realise that the way Kubernetes work is using a declarative set of requirements.


MiniKube Setup Using A Private Repository


This workflow  will setup a private Docker repository on port 5000, that will be used by MiniKube. This obviously saved the full round trip to Docker Cloud.

image


Image taken from https://blog.hasura.io/sharing-a-local-registry-for-minikube-37c7240d0615 up on date 19/02/18


Although its slightly out of scope for this post this section shows you how you should be able to host a private Docker repository in the Docker daemon that lives inside the MiniKube VM that we setup in post 1. Luckily Docker allows its own registry for images to be run as a container using this image : https://hub.docker.com/_/registry/


Which allows you to run a private repository on port 5000


docker run -d -p 5000:5000 --restart always --name registry registry:2

This should then allow you to do things like this

docker pull ubuntu
docker tag ubuntu localhost:5000/ubuntu
docker push localhost:5000/ubuntu


This obviously saves you the full round trip from your PC (Docker Daemon) –> Cloud (Docker repo) –> your PC (MiniKube)

As its now more like this your PC (Docker Daemon) –> your PC (Docker repo)–> your PC (MiniKube) thanks to the local private repo


The idea is that you would do something like this


NOTE : that the 5000 port is also the default one used by the .NET Core Kestrel http listener, so we would need to adjust the port in the Dockerfile for this article, and how we apply the Docker file into Kubernetes to use a different port from 5000, but for now lets carry on with how we might setup a private Docker repo)


in PowerShell

c:\
cd\
minikube.exe start --kubernetes-version="v1.9.0" --vm-driver="hyperv" --memory=1024 --hyperv-virtual-switch="Minikube Switch" --v=7 --alsologtostderr --insecure-registry localhost:5000
minikube docker-env
& minikube docker-env | Invoke-Expression
kubectl.exe apply -f C:\Users\sacha\Desktop\KubernetesExamples\Post2_SimpleServiceStackPod\sswebapp\LocalRegistry.yaml


Then in a Bash shell

kubectl port-forward --namespace kube-system \
$(kubectl get po -n kube-system | grep kube-registry-v0 | \
awk '{print $1;}') 5000:5000


Then back into PowerShell

cd C:\Users\sacha\Desktop\KubernetesExamples\Post2_SimpleServiceStackPod\sswebapp
docker build -t "sswebapp:v1" .
docker tag sacha/sswebapp:v1 localhost:5000/sacha/sswebapp:v1
docker push localhost:5000/sacha/sswebapp:v1
kubectl run simple-sswebapi-pod-v1 --replicas=1 --labels="run=sswebapi-pod-v1" --image=localhost:5000/sacha/sswebapp:v1  --port=5000
kubectl expose deployment simple-sswebapi-pod-v1 --type=NodePort --name=simple-sswebapi-service
kubectl get services simple-sswebapi-service
minikube service simple-sswebapi-service --url 

Obviously you will need replace bits of the above with you own images/paths, but that is the basic idea.


If you cant follow this set of instructions you can try these 2 very good articles on this :


Word Of Warning About Using MiniKube  For Development

Minikube ONLY supports Docker Linux Containers so make sure you have set Docker to use that NOT Windows Containers. You can do this from the Docker system tray icon.

kubernetes

Kubernetes – Part 1 of n, Installing MiniKube

So at the moment I am doing a few things, such as


  • Reading a good Scala book
  • Reading another book on CATS type level programming for Scala
  • Looking into Azure Batch
  • Deciding whether I am going to make myself learn GoLang (which I probably will)


Amongst all of that I have also decided that I am going to obligate myself to writing a small series of posts on Kubernetes. The rough guide of the series might be something like shown below


  1. What is Kubernetes / Installing Minikube (this post)
  2. What are pods/labels, declaring your first pod
  3. Services
  4. Singletons (such as a DB)
  5. ConfigMaps/Secrets
  6. LivenessProbe/ReadinessProbe/Scaling Deployments


So yeah that is the rough guide of what I will be doing. I will most likely condense all of this into a single www.codeproject.com article at the end too, as I find there is a slightly different audience for articles than there is for blob posts.


So what is kubernetes?

Kubernetes (The name Kubernetes originates from Greek, meaning helmsman or pilot, and is the root of governor and cybernetic) is an open-source system for automating deployment, scaling, and management of containerized applications.

It groups containers that make up an application into logical units for easy management and discovery. Kubernetes builds upon 15 years of experience of running production workloads at Google, combined with best-of-breed ideas and practices from the community


Kubernetes builds upon previous ventures by Google such as Borg and Omega, but it also uses the current container darling Docker, and is a free tool.


Kubernetes can run in a variety of ways,  such as

  • Managed cloud service (AWS and Azure both have container services that support Kubernetes out of the box)
  • On bare metal where you have a cluster of virtual machines (VMs) that you will install Kubernetes on (see here for really good guide on this)
  • Minikube – Running a very simple SINGLE node cluster on your own computer (I will be using this for this series just for its simplicity and cost savings)


So without further ado we will be starting this series of with a simple introduction, of how to install Kubernetes locally using Minikube.


Installing Minikube

I am using a Windows PC, so these instructions are biased towards Windows development where we will be using Hyper-V instead of VirtualBox. But if you prefer to use VirtualBox I am sure you can find out how to do the specific bits that I talk about below for Hyper-V in VirtualBox


Ok so lets get started.


Installing Docker


The first thing you will need to do is grab Docker from here (I went with the stable channel). So download and install that. This should be a fairly vanilla install. At the end you can check the installation using 2 methods


Checking your system tray Docker icon


image


And trying a simple command in PowerShell (if you are using Windows)


image


Ok so now that Docker looks good, lets turn our attention to Hyper-V. As I say you could use VirtualBox, but since I am using Windows, Hyper-V just seems a better more integrated choice. So lets make sure that is turned on.


Setup Hyper-V

Launch Control Panel –> Programs and Features


image


Then we want to ensure that Hyper-V is turned on, we do this by using the “Turn Windows features on or off”, and then finding Hyper-V and checking the relevant checkboxes


image


Ok so now that you have Hyper-V enabled we need to launch Hyper-V Manager and add a new Virtual Switch (we will use this Switch name later when we run Minikube). We need to add a new switch to provide isolation from the Virtual Switch that Docker sets up when it installs.

image


So once Hyper-V Manager launches, create a new “External” Virtual Switch


image


Which you will need to configure like this


image


Installing Minikube

Ok now what we need to do is grab the minikube binary from github. The current releases are maintained here : https://github.com/kubernetes/minikube/releases

You will want to grab the one called minikube-windows-amd64 as this blog is a Windows installation guide. Once downloaded you MUST copy this file to the root of C:\. This needs to be done due a known bug (read  more about it here : https://github.com/kubernetes/minikube/issues/459).


Ok so just for you own sanity rename the file c:\minikube-windows-amd64 to c:\minikube.exe for brevity when running commands.


Installing kubectrl.exe

Next you will need to download kubectrl.exe which you can do by using a link like this, where you would fill the link with the version you want. For this series I will be using v1.9.0 so my link address is : http://storage.googleapis.com/kubernetes-release/release/v1.9.0/bin/windows/amd64/kubectl.exe Take this kubectrl.exe and place it alongside you minikube.exe in C:\


Provisioning the cluster

Ok so now that we have the basic setup, and required files, we need to test our installation. But before that it is good to have a look at the minikube.exe commands/args which are all documented via a command like this which you can run in PowerShell


image


The actual command we are going to use it as follows

.\minikube.exe start --kubernetes-version="v1.9.0" --vm-driver="hyperv" --memory=1024 --hyperv-virtual-switch="Minikube Switch" --v=7 --alsologtostderr


You may be wondering where some of these values come from. Well I have to admit it is not that clear from the command line –help text you see above. You see above. You do have to dig a bit. perhaps the most intriguing ones above are

  • vm-driver
  • hyperv-virtual-switch


These instruct minikube to use HyperV and also to use the new HyperV Manager switch we set up above.

Make sure you get the name right. It should match the one you setup


You can read more about the HyperV command args here  : https://github.com/kubernetes/minikube/blob/master/docs/drivers.md#hyperV-driver


Anyway lets get back to business where we run this command line (I am using PowerShell in Administrator mode), we should see some output like this, where it eventually ends up with some like this

image


This does a few things for you behind the scenes

  • Creates a Docker Vm which is run in HyperV for you
  • The host is provisioned with boot2docker.iso and set up
  • It configures kubectrl.exe to use the local cluster


Checking Status

You can check on the status of the cluster using the following command like


image


Stale Context

If you see this sort of thing

image

You can fix this like this:

image


Verifying other aspects

The final task to ensure that the installation is sound is to try and view the cluster info and dashboard, like this:


image


This should bring up a web UI

image


So that is all looking good.


So that’s it for this post, I will start working on the next ones very soon….stay tuned