Azure

Azure : Redis Cache

This is a new post in a series of beginners articles on how to do things in Azure. This series will be for absolute beginners, and if you are not one of those this will not be for you.

You can find the complete set of posts that make us this series here :

https://sachabarbs.wordpress.com/azure/

This time we will look at how to use the preview of the Azure Redis Cache.

For this one you will need access to the new Azure portal:

https://portal.azure.com/

Why Redis Cache

I have used Redis in the past when I was looking into different NoSQL options, which you can read about here :

https://sachabarbs.wordpress.com/2012/05/21/document-dbs-a-quick-look-at-some-of-them/

Redis was very easy to use an I found it very easy to store complex JSON object in it, at the time I was using the ServiceStack.Redis client libs.

Here is what Scott Guthries blog has to say about the preview Redis Cache for Azure

Unlike traditional caches which deal only with key-value pairs, Redis is popular for its support of high performance data types, on which you can perform atomic operations such as appending to a string, incrementing the value in a hash, pushing to a list, computing set intersection, union and difference, or getting the member with highest ranking in a sorted set.  Other features include support for transactions, pub/sub, Lua scripting, keys with a limited time-to-live, and configuration settings to make Redis behave more like a traditional cache.

Finally, Redis has a healthy, vibrant open source ecosystem built around it. This is reflected in the diverse set of Redis clients available across multiple languages. This allows it to be used by nearly any application, running on either Windows or Linux, that you host inside of Azure.

http://weblogs.asp.net/scottgu/azure-redis-cache-disaster-recovery-to-azure-tagging-support-elastic-scale-for-sqldb-docdb


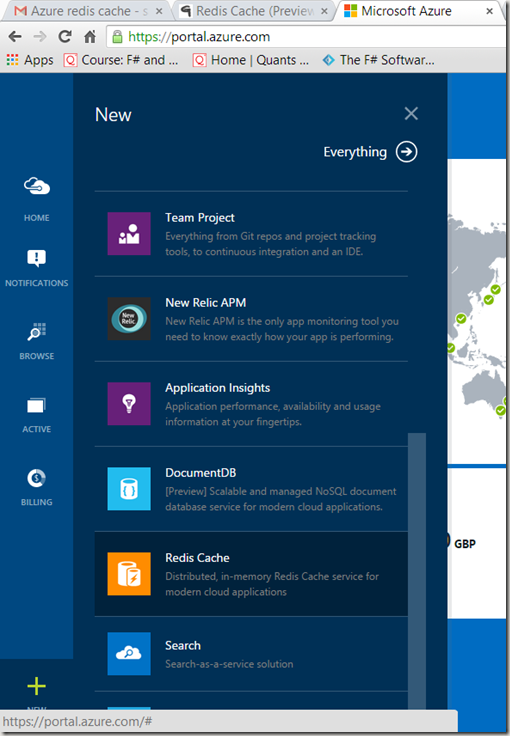
Creating the Cache

image

This will launch a wizard where you can pick the name/pricing plan etc etc

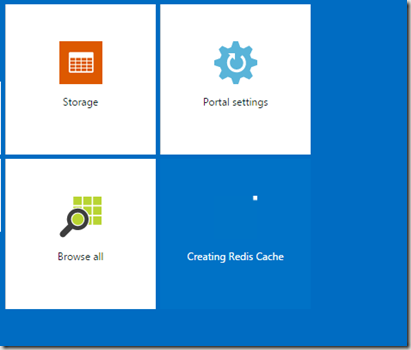
It may take a few minutes to configure the cache for the first time, you can see this in the portal, as shown below

image

You may also check on the status of all your configured Azure items in the new Portal, using the BROWSE button, as shown below:

image

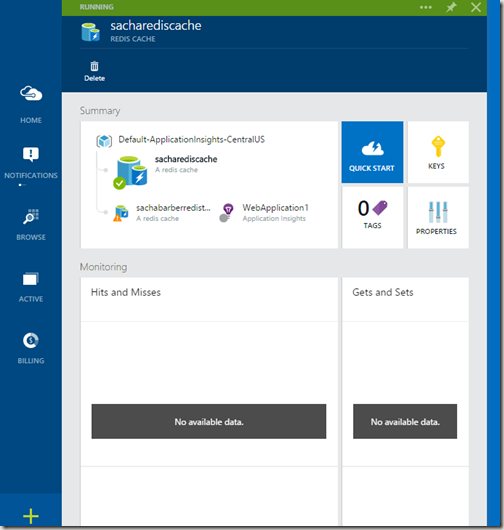
Once you have successfully created a Cache, you will see something like this:

image

From here you can grab the keys for your account, which we will use in the next bit of this post

Using A Created Cache

So once you have created a Redis Cache using the preview portal you will likely want to connect and use it. So lets have a look at that shall we.

We start by getting the connection details, this requires 2 steps:

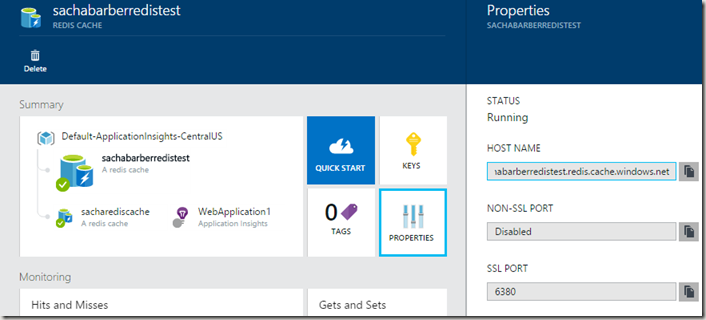
1. Get the url, which is easy to get using the properties window, as shown below

image

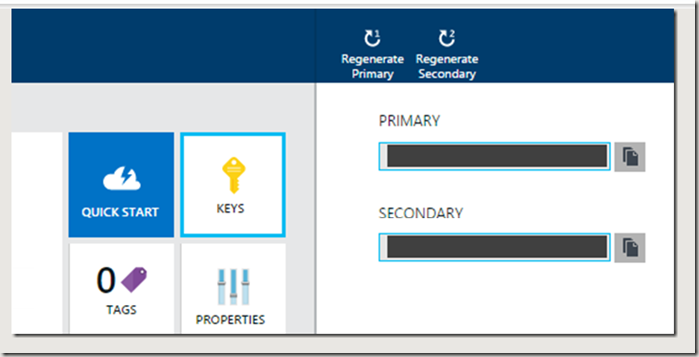
2. Once you have copied the host name url, we need to copy the password, which you can grab from the keys area

image

Once you have these 2 bits of information, we are able to start using the Redis Azure cache.

Code Code Code

You will need to add the following NuGet package : StackExchange.Redis

NuGet command line > Install-Package StackExchange.Redis

Once you have that, its finally time to start coding, so what do you need to use the cache.

Not much as it turns out. The following is a fully working program, which stores and retrieves some basic string values, and also a fully serialized object.

NOTE : To see what types you can use with the Redis Cache read this link : http://redis.io/topics/data-types

using System;
using System.Collections.Generic;
using System.Linq;
using System.Text;
using System.Threading.Tasks;
using Newtonsoft.Json;
using StackExchange.Redis;

namespace AzureRedisCacheDemo
{
    class Program
    {
        static void Main(string[] args)
        {
            ConnectionMultiplexer connection = ConnectionMultiplexer.Connect(
                "sachabarberredistest.redis.cache.windows.net,ssl=true,password=*** YOUR ACCOUNT KEY HERE ***");

            IDatabase cache = connection.GetDatabase();

            // Perform cache operations using the cache object...
            // Simple put of integral data types into the cache
            cache.StringSet("key1", "dsyavdadsahda");
            cache.StringSet("key2", 25);

            Foo foo1 = new Foo() {Age = 1, Name = "Foo1"};
            var serializedFoo = JsonConvert.SerializeObject(foo1);
            cache.StringSet("serializedFoo", serializedFoo);

            Foo foo3 = new Foo() { Age = 1, Name = "Foo3" };
            var serializedFoo3 = JsonConvert.SerializeObject(foo1);
            cache.StringSet("serializedFoo3", serializedFoo3);


            // Simple get of data types from the cache
            string key1 = cache.StringGet("key1");
            int key2 = (int)cache.StringGet("key2");


            var foo2 = JsonConvert.DeserializeObject<Foo>(cache.StringGet("serializedFoo"));
            bool areEqual = foo1 == foo2;


            var foo4 = JsonConvert.DeserializeObject<Foo>(cache.StringGet("serializedFoo3"));
            bool areEqual2 = foo3 == foo4;


            Console.ReadLine();
        }
    }


    public class Foo : IEquatable<Foo>
    {
        public string Name { get; set; }
        public int Age { get; set; }

        public bool Equals(Foo other)
        {
            if (ReferenceEquals(null, other)) return false;
            if (ReferenceEquals(this, other)) return true;
            return string.Equals(Name, other.Name) && Age == other.Age;
        }

        public override bool Equals(object obj)
        {
            if (ReferenceEquals(null, obj)) return false;
            if (ReferenceEquals(this, obj)) return true;
            if (obj.GetType() != this.GetType()) return false;
            return Equals((Foo) obj);
        }

        public override int GetHashCode()
        {
            unchecked
            {
                return ((Name != null ? Name.GetHashCode() : 0)*397) ^ Age;
            }
        }

        public static bool operator ==(Foo left, Foo right)
        {
            return Equals(left, right);
        }

        public static bool operator !=(Foo left, Foo right)
        {
            return !Equals(left, right);
        }
    }
}

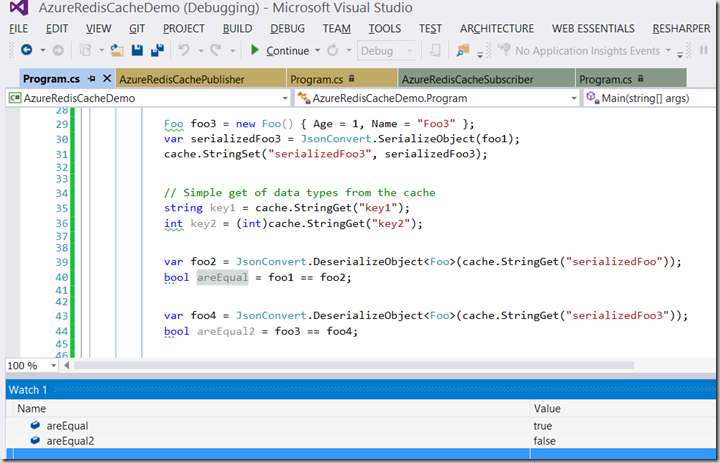
When you run this code you should see something like this:

image

It is a VERY simple demo, but demonstrates the cache nicely I feel.

In this example I am using JSON.Net to serialize objects to strings, which are then stored in the Redis Cache, you may have some other serializer you prefer, but this does illustrate the point of a working Redis Cache ok I feel.


StackExchange.Redis Pub.Sub

Redis may also be used as a pub/sub framework, which you can use as follows:

Here is a basic publisher

using System;
using System.Collections.Generic;
using System.Linq;
using System.Text;
using System.Threading.Tasks;
using Newtonsoft.Json;
using StackExchange.Redis;

namespace AzureRedisCachePublisher
{
    class Program
    {
        static void Main(string[] args)
        {
            ConnectionMultiplexer connection = ConnectionMultiplexer.Connect(
                "sachabarberredistest.redis.cache.windows.net,ssl=true,password=*** YOUR ACCOUNT KEY HERE ***");
            ISubscriber sub = connection.GetSubscriber();

            Console.WriteLine("Press a key to pubish");
            Console.ReadLine();


            sub.Publish("messages", "This is from the publisher");

            Console.ReadLine();
        }
    }

}

  And here is a basic Subscriber


using System;
using System.Collections.Generic;
using System.Linq;
using System.Text;
using System.Threading.Tasks;
using Newtonsoft.Json;
using StackExchange.Redis;

namespace AzureRedisCacheSubscriber
{
    class Program
    {
        static void Main(string[] args)
        {
            ConnectionMultiplexer connection = ConnectionMultiplexer.Connect(
                "sachabarberredistest.redis.cache.windows.net,ssl=true,password=*** YOUR ACCOUNT KEY HERE ***");
            ISubscriber sub = connection.GetSubscriber();

            sub.Subscribe("messages", (channel, message) =>
            {
                Console.WriteLine((string)message);
            });


            Console.ReadLine();
        }
    }


 }

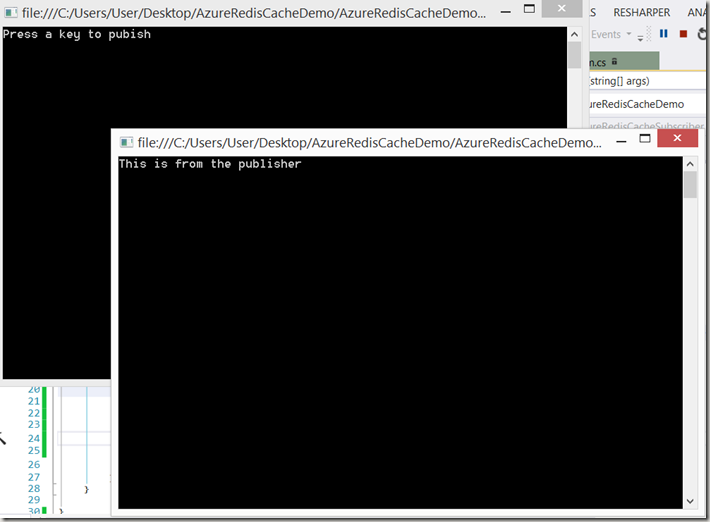
Which when run will give you something like this:


image

  Anyway that is all for now, enjoy until next time.


This has barely scratched the surface of working with StackExhange.Redis, if you want to know more read the documentation here: https://github.com/StackExchange/StackExchange.Redis
powershell

PowerShell : Http Get/Post

This is another article in my on going learning/experimenting with PowerShell. This time I will show how you can use PowerShell to carry out REST operations such as GET/POST.

Now there may be some amongst you, who go why didn’t you just use WGet, which is a downloadable thing, and I could have indeed used that, except for the part that the machine I need to run this on, is so locked down that I can only use things that are already installed. So raw PowerShell it is

Here is the relevant PowerShell code, which allows 3 parameters to control the script

  • Target : The url
  • Verb : This is the http verb, GET, PUT etc
  • Content : This could be some content when doing a POST request for example

It just makes use of some very standard .NET classes namely WebRequest

[CmdletBinding()]
Param(
 
 
    [Parameter(Mandatory=$True,Position=1)]
    [string] $target,
 
    [Parameter(Mandatory=$True,Position=2)]
    [string] $verb,      
 
    [Parameter(Mandatory=$False,Position=3)]
    [string] $content
 
)
 
 
write-host "Http Url: $target"
write-host "Http Verb: $verb"
write-host "Http Content: $content"


$webRequest = [System.Net.WebRequest]::Create($target)
$encodedContent = [System.Text.Encoding]::UTF8.GetBytes($content)
$webRequest.Method = $verb
 
write-host "UTF8 Encoded Http Content: $content"
if($encodedContent.length -gt 0) {
    $webRequest.ContentLength = $encodedContent.length
    $requestStream = $webRequest.GetRequestStream()
    $requestStream.Write($encodedContent, 0, $encodedContent.length)
    $requestStream.Close()
}
 
[System.Net.WebResponse] $resp = $webRequest.GetResponse();
if($resp -ne $null) 
{
    $rs = $resp.GetResponseStream();
    [System.IO.StreamReader] $sr = New-Object System.IO.StreamReader -argumentList $rs;
    [string] $results = $sr.ReadToEnd();
 
    return $results 
}
else
{
    exit ''
}

Here is an example usage (assuming the above script is saved as http.ps1 somewhere):

Http.ps1 -target “http://www.google.com” -verb “GET”

Which would give the following sort of output:

image

Anyway that’s it for now, hope this helps

Azure

Azure : Blob Storage / Retrieval

This is a new post in a series of beginners articles on how to do things in Azure. This series will be for absolute beginners, and if you are not one of those this will not be for you.

You can find the complete set of posts that make us this series here :

https://sachabarbs.wordpress.com/azure/

This time we will look at how to use Azure blob storage for uploading things like files (images, word documents, whatever you like really).

Introduction To Blob Storage

What exactly is Blob Storage? Well it is actually very simple, it is Azure hosted storage that allows you to upload large amounts of unstructured data (typically binary data, so bytes) that may be shared publicly using http/https.

Typical usage may be:

  • Storing images
  • Storing documents
  • Storing videos
  • Storing music

A typical Azure blob service would make use of these components

image

Account

This would be your Azure storage account. You must create a storage account using the Azure portal, which you would do through the portal : https://manage.windowsazure.com (we will see more on this in just a minute)

Container(s)

These belong to Account, and are using to group blob(s). Each account can have unlimited number of containers, and each container may contain an unlimited number of blobs.

Blob(s)

Blobs represent the Azure hosted data that represent the originally uploaded binary data. It is the blobs that you would eventual end up loading when you share an Azure blob storage url.

There are 2 types of blob storage available

Block Blobs

These are binary blocks of up to 200GB, where you can upload 64MB at one time, Typically for a larger block, you would spit things up and upload them in chunks using multiple threads, and Azure will reassemble them making the available as a single blob.

Page Blobs

These can be up to 1TB and consist of a collection of 512 pages. You would set a maximum size when creating the page blob. I have not used these so much, and personally I think these are here to support other Azure features like Virtual Hard Drives (VHDs) which are stored as page blobs in Azure Storage.


Url Syntax

The actual blob url format is as shown below:

http://<storage account>.blob.core.windows.net/<container>/<blob>


How To Get An Azure Storage Account

The first thing you will need to do is create a storage account, this is easily achieved by using the portal. Go to the portal : https://manage.windowsazure.com, and then click new

image

Then pick storage, and go through creating a new Storage Account

image


Then once you have that you can open the newly created storage account, and click the dashboard, and that will show you the relevant connection strings which you may use in your application

image

Using The Storage Emulator

NOTE : If you just want to try things out without going through the process of creating a Storage Account, you can actually use the Storage Emulator, which you can do using a account connection string something like this:

<!-- TODO : This would need to change to live azure value when deployed -->
    <add key="azureStorageConnectionString" value="UseDevelopmentStorage=true;" />

Since I am writing the bulk of these posts on a train without any internet connectivity, I will be using the storage emulator in any demos in this post.

If you want to use the emulator, ensure that is running, and that you have enabled the storage emulator

image

image


Getting The Right NuGet Package

You will need to install this NuGet Package to work with Azure Blob Storage “WindowsAzure.Storage”


Creating A Container

This is done using the following sort of code

CloudStorageAccount storageAccount = CloudStorageAccount.Parse(
    ConfigurationManager.AppSettings["StorageConnectionString"]);

CloudBlobClient blobClient = storageAccount.CreateCloudBlobClient();

// get blob container
CloudBlobContainer container = blobClient.GetContainerReference("testcontainer5");
container.CreateIfNotExists();


container.SetPermissions(
new BlobContainerPermissions
{
    PublicAccess = BlobContainerPublicAccessType.Blob
});

Uploading A File To Azure Blob Storage

This is done using the following code

CloudBlockBlob cloudBlockBlob = container.GetBlockBlobReference(
    "mandrillBlobUploaedToAzure.jpg");
cloudBlockBlob.Metadata["TypeOfImage"] = "Animal";

// Create or overwrite the "myblob" blob with contents from a local file.
using (var fileStream = System.IO.File.OpenRead(@"C:\Users\User\Pictures\mandrill.jpg"))
{
    cloudBlockBlob.UploadFromStream(fileStream);
    Console.WriteLine("Blob Url : {0}", cloudBlockBlob.Uri);
}


Listing All Blobs In A Container

This is done using the following code

container = blobClient.GetContainerReference("sachasContainer");

// Loop over items within the container and output the length and URI.
foreach (IListBlobItem item in container.ListBlobs(null, false))
{
    if (item.GetType() == typeof(CloudBlockBlob))
    {
        CloudBlockBlob blob = (CloudBlockBlob)item;

        Console.WriteLine("Block blob of length {0}: {1}", blob.Properties.Length, blob.Uri);

    }
}

Download Blobs

This is done using this sort of code

CloudBlockBlob blockBlob = container.GetBlockBlobReference("mandrillBlobUploaedToAzure.jpg");

// Save blob contents to a file.
using (var fileStream = System.IO.File.OpenWrite(@"C:\Users\User\Pictures\XXX.jpg"))
{
    blockBlob.DownloadToStream(fileStream);
}

Blob Metadata

Blobs support metadata via a dictionary which is available using the Metadata property which is a simple key/value pair.


How To Add Descriptive Metadata To A Blob

This is actually very easy, you just store more data in either a SQL Azure or SQL Azure table storage where you would include the blobs Url.  Job done


Deleting A Blob From A Container

This is done using this sort of code

blockBlob = container.GetBlockBlobReference("mandrillBlobUploaedToAzure.jpg");

// Delete the blob.
blockBlob.Delete();
Azure

Azure : SQL Azure

This is a new post in a series of beginners articles on how to do things in Azure. This series will be for absolute beginners, and if you are not one of those this will not be for you.

You can find the complete set of posts that make us this series here :

https://sachabarbs.wordpress.com/azure/

This time we will look at how to create a new SQL server database within Azure (in a later article we will loot using Microsofts NoSQL database “DocumentDB”)

Anyway so step 1, is to open up the portal

https://manage.windowsazure.com


From there you can click on “SQL Databases” and choose the “Create a SQL Database” hyperlink

image

From there you need to fill in your preferences within the wizard

image

image

Once this wizard has completed you will see a new database has been created

image

IMPORTANT : When the database is created, you will need to ensure that the standard port 1433 is opened. One of the easiest ways to do that, is to use the Azure portal to query the database (even though there is no tables in the database yet)

image

This little cheat will prompt you to open up the Firewall ports, which is great, lets just let the Azure portal do this work for us

image

So once the port is open, you will be redirected to an app in the browser (Silverlight app at present), that allows you to use your connection details you chose

image

When you successfully connect you should see something like this

image

Now there is no data in the SQL database yet. We could use this Silverlight app to add some tables, and data. However I would prefer to do that in Visual Studio, so lets go back to the portal, and open the connection strings, as shown below

image

image

We are interested in the ADO .NET one, where the part I have highlighted is the important part you need

image

SO grabbing the connection address to the Azure SQL server instance, lets connect via Visual Studio, and create a table

image

Once you have a connection in Visual Studio, lets create a new table using the context menu

image

When you are happy with the table, click the “Update” button which will push the changes to Azure. This is only a demo, for a real app you would likely have some sort of scripts, or would use the Entity Framework migrations facility to manage changes

image

image

So now lets check everything worked by connecting to the Azure SQL database from SQL server management studio.

image

As we can see we see the table we just created above

image

And lets also check the Azure portal query app

image

Yep, the table looks good, there is no data there yet, as expected for a new table. So lets now turn our attention to getting some data into the new table.

Lets use a new Entity Framework model to talk to the new SQL Azure database/table we just created.

image

I went with the defaults but you can choose what you like

image

This will result in a few files being created in the demo app, such as these, as well as an entry in the App.Config file to point to the SQL Azure database instance

image

And here is some code that will do some basic CRUD operation using the Entity Framework context that was created for us.

using System;
using System.Collections.Generic;
using System.Linq;
using System.Text;
using System.Threading.Tasks;

namespace SQLAzureTest
{
    class Program
    {
        static void Main(string[] args)
        {

            //insert
            using (var sachaAzureSQLEntities = new SachaAzureSQLEntities())
            {
                sachaAzureSQLEntities.Orders.Add(new Order()
                {
                    //note we are spelling this wrong so we can update it later
                    Description = "Buzz Lighyear toy",
                    Quanitity = 1
                });
                sachaAzureSQLEntities.SaveChanges();


                //select
                var order = sachaAzureSQLEntities.Orders.Single(
                    x => x.Description == "Buzz Lighyear toy");
                Console.WriteLine("Order : Id: {0}, Description: {1}, Quanity {2}",
                    order.Id, order.Description, order.Quanitity);

                //update
                order.Description = "Buzz Lightyear toy";
                sachaAzureSQLEntities.SaveChanges();

                var exists = sachaAzureSQLEntities.Orders.Any(
                    x => x.Description == "Buzz Lighyear toy");
                Console.WriteLine("Buzz Lighyear toy exists :  {0}", exists);

                order = sachaAzureSQLEntities.Orders.Single(
                    x => x.Description == "Buzz Lightyear toy");
                Console.WriteLine("Order : Id: {0}, Description: {1}, Quanity {2}",
                    order.Id, order.Description, order.Quanitity);


                //delete
                sachaAzureSQLEntities.Orders.Remove(order);
                sachaAzureSQLEntities.SaveChanges();

                Console.WriteLine("Orders count :  {0}", 
                    sachaAzureSQLEntities.Orders.Count());


            }

            Console.ReadLine();
        }
    }
}

And here is the results of this against the SQL Azure instance we just created.

image

Azure

Azure : Provisioning a Virtual Machine

This is a new post in a series of beginners articles on how to do things in Azure. This series will be for absolute beginners, and if you are not one of those this will not be for you.

You can find the complete set of posts that make us this series here :

https://sachabarbs.wordpress.com/azure/

This time we will look at how to create a new Virtual Machine using the Compute element of Microsoft Azure.

This again will be quite a screen shot heavy posting (its only a couple of the posts that will be like this, a lot of the subsequent ones will be much more codey, which is probably a good thing as there is a new version of the Azure portal waiting in the wings that has a different look and feel)

Anyway so step 1, is to open up the portal

https://manage.windowsazure.com

From there you will want to create a new Virtual machine, this can be done by clicking on the “New” button in the Azure portal.

image

From here you can choose what new thing you want to create in Azure. As this post is all about Virtual Machines, we will choose to create a Virtual Machine using the Azure compute element. This can be seen in the screen shot below. Azure comes with a whole load of pre canned images where the most common ones are shown in the list. You can also choose to examine more images, which is what we will be doing in  this post. So you would use the “More images” drop down item, as shown below

image

This will take you to a wizard that allows you to choose your Virtual Machine image and setup, and username/password

image


image

image

image

Once you have completed the wizard a new Virtual Machine, should be listed in the Azure portal for you. This is as shown below, for this posts example.

image

You can go into the Virtual Machine and view information about it, such as its public IP address, its DNS name etc etc

image

More importantly is the “Connect” button. When you click that a new Remote Desktop item will be created and downloaded for you. You can then use that to gain access to the Virtual Machine you setup.

One word of warning though is that the Status of the Virtual Machine MUST be “Running”, the status of the Virtual Machine can be seen in the screen shot above.

image

image

Here is me connected to a Virtual Machine (a standard Windows 2008 server), that I created another time.

image

Anyway hope that helps someone, another step along the Azure highway

Azure

Azure : How to publish a web site from VS2013 to Azure

This is the first post in a series of beginners articles on how to do things in Azure. This series will be for absolute beginners, and if you are not one of those this will not be for you.

You can find the complete set of posts that make us this series here :

 https://sachabarbs.wordpress.com/azure/

This time we will be looking at how to create and publish a web site to Azure using the Azure web portal (there is a new version of this coming soon, but for now it looks as shown below).

The first thing you will need is an Azure subscription, if you don’t have one of these you will need to get one. Once you have that you can sign into the portal.

Once you have signed into the Azure portal you simple need to create a new web site, I personally use the “Quick Create” option, and then you need to pick the Url and region for the new site. 

image

This will then create a new website place holder in Azure. You now need to go into the newly created place holder web site, which will take you into the Azure page for the new web site

image

From there you will be able to download the publish profile. This will be a single file which you should store somewhere where you will remember it.

image

Now you can go into Visual Studio 2013, and create a new website. I chose to go with one of the standard templates, where I simply altered the content a bit, such that I know the publishing step we will do later actually worked.

image

Once you are happy with your awesome web site you can right click and use the “Publish Web Site” menu.

image

This will then present you with some choices. You can use the “Import” option, and then browse to the publish profile settings file you downloaded in the Azure web portal step.

image

All you then need to do is follow the wizard through, and make sure you click “publish” at the end and you should then up with a lovely website hosted in Azure, as can be seen from the screen show below.

image

Not rocket science I know, but as I say this is for absolute Azure beginners.