So it has taken me a while to do this post,so apologies on that front. Anyway if you recall from the 1st article in this series of posts this was the rough agenda
- What is Kubernetes / Installing Minikube
- What are pods/labels, declaring your first pod (this post)
- Services
- Singletons (such as a DB)
- ConfigMaps/Secrets
- LivenessProbe/ReadinessProbe/Scaling Deployments
So as you can see above this post will talk about PODs in Kubernetes. So lets jump straight in
What Is a POD?
Here is the official blurb from the Kubernetes web site
A pod (as in a pod of whales or pea pod) is a group of one or more containers (such as Docker containers), with shared storage/network, and a specification for how to run the containers. A pod’s contents are always co-located and co-scheduled, and run in a shared context. A pod models an application-specific “logical host” – it contains one or more application containers which are relatively tightly coupled — in a pre-container world, they would have executed on the same physical or virtual machine.
While Kubernetes supports more container runtimes than just Docker, Docker is the most commonly known runtime, and it helps to describe pods in Docker terms.
The shared context of a pod is a set of Linux namespaces, cgroups, and potentially other facets of isolation – the same things that isolate a Docker container. Within a pod’s context, the individual applications may have further sub-isolations applied.
Containers within a pod share an IP address and port space, and can find each other via localhost. They can also communicate with each other using standard inter-process communications like SystemV semaphores or POSIX shared memory. Containers in different pods have distinct IP addresses and can not communicate by IPC without special configuration. These containers usually communicate with each other via Pod IP addresses.
Applications within a pod also have access to shared volumes, which are defined as part of a pod and are made available to be mounted into each application’s filesystem.
In terms of Docker constructs, a pod is modelled as a group of Docker containers with shared namespaces and shared volumes.
Like individual application containers, pods are considered to be relatively ephemeral (rather than durable) entities. As discussed in life of a pod, pods are created, assigned a unique ID (UID), and scheduled to nodes where they remain until termination (according to restart policy) or deletion. If a node dies, the pods scheduled to that node are scheduled for deletion, after a timeout period. A given pod (as defined by a UID) is not “rescheduled” to a new node; instead, it can be replaced by an identical pod, with even the same name if desired, but with a new UID (see replication controller for more details). (In the future, a higher-level API may support pod migration.)
When something is said to have the same lifetime as a pod, such as a volume, that means that it exists as long as that pod (with that UID) exists. If that pod is deleted for any reason, even if an identical replacement is created, the related thing (e.g. volume) is also destroyed and created anew.

A multi-container pod that contains a file puller and a web server that uses a persistent volume for shared storage between the containers.
Taken from https://kubernetes.io/docs/concepts/workloads/pods/pod/#what-is-a-pod up on date 16/01/18
Ok so that’s the official low down. So what can we extract from the above paragraph that will help us understand a bit more about how to get what a POD is, and how we can create our own ones?
- PODs can run one or more things (in containers)
- It supports multiple container providers but everyone mainly uses Docker
- PODs seem to be lowest building block in the Kubernetes echo-system
Alright, so now that we know that, we can get to work with some of this. What we can do is think up a simple demo app that would allow us to exercise some (though not all, you will have to learn some stuff on your own dime) of the Kubernetes features.
- A simple web API is actually quite a good choice as it usually exposes a external façade that can be called (REST endpoint say), and it is also easy to use to demonstrate some more advanced Kubenetes topics such as
- Services
- Deployments
- Replication Sets
- Health Checks
The Service Stack REST API
So for this series of posts we will be working with a small Service Stack REST API that we will expand over time. For this post, the ServiceStack endpoint simple allows this single route
- Simple GET : http:[IP_ADD]:5000/hello/{SomeStringValueOfYourChoice}
In that route the [IP_ADD] is of much interest. This will ultimately be coming from Kubenetes. Which will get to by the end of this post.
Where Is It’s Code?
The code for this one will be available here : https://github.com/sachabarber/KubernetesExamples/tree/master/Post2_SimpleServiceStackPod/sswebapp
I think my rough plan at this moment in time is to create a new folder for each post, even though the underlying code base will not be changing that much. That way we can create a new Docker image from each posts code quite easily where we can tag it with a version and either push it DockerHub or a private docker repository (we will talk about this in more detail later)
For now just understand that one post = one folder in git, and this will probably end up being 1 tagged verion of a Docker image (if you don’t know what that means don’t worry we will cover more of that later too)
So What Does The ServiceStack API Look Like?
Well it is a standard ServiceStack .NET Core API project (which I created using the ServiceStack CLI tools). The rough shape of it is as follows

- sswebapp = The actual app
- sswebapp.ServiceInterface = The service contract
- sswebapp.ServiceModel = The shared contracts
- sswebapp.Tests = Some simple tests
I don’t think there is that much merit in walking through all this code. I guess the only one call out I would make with ServiceStack is that it uses a Message based approach rather than a traditional URL/Route based approach. You can still have routing but it’s a secondary concern that is overriden by the type of message being the real decided in what code gets called based on the payload sent.
For this posts demo app this is the only available route
using ServiceStack;

namespace sswebapp.ServiceModel
{
    [Route("/hello")]
    [Route("/hello/{Name}")]
    public class Hello : IReturn<HelloResponse>
    {
        public string Name { get; set; }
    }

    public class HelloResponse
    {
        public string Result { get; set; }
    }
}
This would equate to the following route GET : http:[IP_ADD]:5000/hello/{SomeStringValueOfYourChoice} where the {SomeStringValueOfYourChoice} would be fed into the Name property of the Hello object shown above
The Docker File
Obviously since we know we need an image for Kubernetes to work properly, we need to create one. As we now know Kubernetes can work with many different container providers, but it does has a bias towards Docker. So we need to Docker’ize the above .NET Core Service Stack API example. How do we do that?
Well that part is actually quite simple, we just need to create a Docker file. So without further ado lets have a look at the Dockerfile for this demo code above
FROM microsoft/aspnetcore-build:2.0 AS build-env
COPY src /app
WORKDIR /app

RUN dotnet restore --configfile ./NuGet.Config
RUN dotnet publish -c Release -o out

# Build runtime image
FROM microsoft/aspnetcore:2.0
WORKDIR /app
COPY --from=build-env /app/sswebapp/out .
ENV ASPNETCORE_URLS http://*:5000
ENTRYPOINT ["dotnet", "sswebapp.dll"]
These are main points from the above:
- We use microsoft/aspnetcore-build:2.0 as the base image
- We are then able to use the dotnet command to do a few things
- We then bring in another later microsoft/aspnetcore
- Before finally adding our own code as the final layer for Docker
- We then specify port (annpyingly the Kestrel webserver that comes with .NET Core is only port 5000, which is also by some strange act of fate the port that a Docker private repo wants to use….but more on this later), for now we just want to expose the port and specify the start up entry point
MiniKube Setup Using DockerHub
For this section I am using the most friction free way of testing out minikube + Docker images. I am using Docker Cloud to host my repo/images. This is the workflow for this section
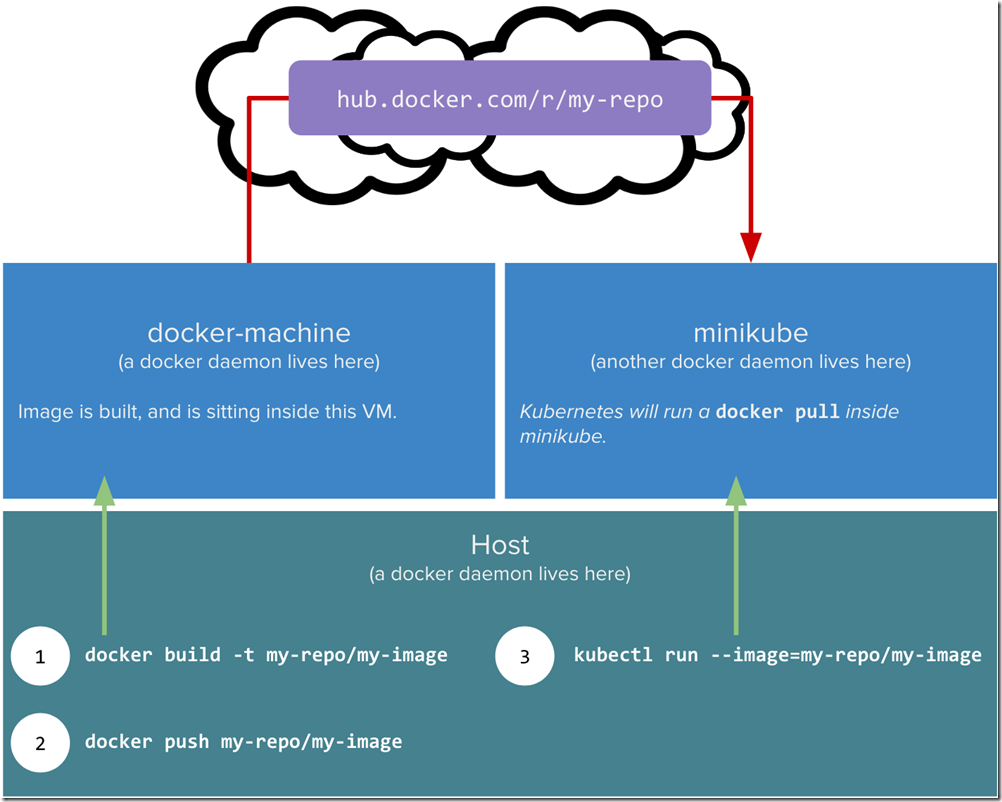
Image taken from https://blog.hasura.io/sharing-a-local-registry-for-minikube-37c7240d0615 up on date 19/02/18
The obvioulsy issue here is that we have a bit of software locally we want to package up into a Docker image and use in MiniKube which is also on our local box. However the Docker daemon in MiniKube is not the same one as outside of MiniKube. Remember MiniKube is in effect a VM that just runs headless. There is also more complication where by MiniKube will want to try and pull images, and may require security credentials. We can work around with this by creating a private docker repo (which I will not use in this series but do talk about below). The article linked above and the other one which I mention at the bottom are MUST reads if you want to do that with MiniKube. I did get it working, but however opted for a simple life and will be using DockerHub to store all my images/repos for this article series.
Ok now that we have a DockerFile and we have decided to use DockerHub to host the repo/image, how do we get this to work in Kubernetes?
Pushing To DockerHub
So the first thing you will need to do is create a DockerHub account, and then create a PUBLIC repo. For me the repo was called “sswebapp” and my DockerHub user is ”sachabarber”. So this is what it looks like in DockerHub after creating the repo

Ok with that now in place we need to get the actual Docker image up to DockerHub. How do we do that part?
These are the steps (obviously your paths may be different)
docker login --username=sachabarber
cd C:\Users\sacha\Desktop\KubernetesExamples\Post2_SimpleServiceStackPod\sswebapp
docker build -t "sswebapp:v1" .
docker tag sswebapp:v1 sachabarber/sswebapp:v1
docker push sachabarber/sswebapp
Ok so with now in place all we need to do is take care of the Kubernetes side of things now
Running A DockerHub Image In Kubernetes
So we now have a DockerHub image available, we now need to get Kubernetes to use that image. With Kubenetes there is a basic set of Kubectl commands that cover most of the basics, and then if that is not good enough you can specify most things in YAML files.
We will start out with Kubectl commands and then have a look at what the equivalent YAML would have been
So this is how we can create a POD which must be exposed via something called a service, which for now just trust me you need. We will be getting on to these in a future post.
c:\
cd\
minikube.exe start --kubernetes-version="v1.9.0" --vm-driver="hyperv" --memory=1024 --hyperv-virtual-switch="Minikube Switch" --v=7 --alsologtostderr
kubectl run simple-sswebapi-pod-v1 --replicas=1 --labels="run=sswebapi-pod-v1" --image=sachabarber/sswebapp:v1  --port=5000
kubectl expose deployment simple-sswebapi-pod-v1 --type=NodePort --name=simple-sswebapi-service
kubectl get services simple-sswebapi-service
minikube service simple-sswebapi-service --url
So what exactly is going on in there? Well there are a few things of note:
- We are starting minikube up
- We use Kubectl to run a new deployment (this is our POD that makes use of our DockerHub image) and we also expose a port at this time
- We use Kubectl to expose the deployment via a service (future posts will cover this)
- We then get our new service grab the external Url from it using the “—url” flag, and then we can try it in a browser
What Would All This Look Like In YAML?
So above we saw 2 lines that create the deployment and one that creates a service. I also mentioned that the Kubctl.exe command line will get you most of the way there for basics, but for more sophisticated stuff we need to use YAML to describe the requirements.
Lets have a look at what the Deployment / Service would look like in YAML.
Here is the Deployment
using command line
kubectl run simple-sswebapi-pod-v1 --replicas=1 --labels="run=sswebapi-pod-v1" --image=sachabarber/sswebapp:v1 --port=5000
And here is the YAML equivalent
apiVersion: extensions/v1beta1
kind: Deployment
metadata:
  name: simple-sswebapi-pod-v1
spec:
  replicas: 1
  template:
    metadata:
      labels:
        app: run=sswebapi-pod-v1
    spec:
      containers:
      - name: sswebapi-pod-v1
        image: sachabarber/sswebapp:v1
        ports:
        - containerPort: 5000
Here is the Service
using command line
kubectl expose deployment simple-sswebapi-pod-v1 --type=NodePort --name=simple-sswebapi-service
And here is the YAML equivalent
apiVersion: v1
kind: Service
metadata:
  name: simple-sswebapi-service
spec:
  selector:
    app: run=sswebapi-pod-v1
  ports:
  - protocol: TCP
    port: 5000
    targetPort: 5000
  type: NodePort
When you use YAML files these must be applied as follows:
kubectl apply -f <FILENAME>
Now that we have all the stuff in place, and deployed we should be able to try things out. Lets do that now.
Importance Of Labels
Labels in Kubernetes play a vital role, in that they allow other higher level abstractions, to quickly locate PODs for things like
- Exposing via a service
- Routing
- Replica sets checks
- Health checks
- Rolling upgrades
All of these higher level abstractions are looking for things based on a particular version. Labels also come with selector support, that allows Kubernetes to identify the right PODs for an action. This is an important concept are you would do well to read the official docs on this : https://kubernetes.io/docs/concepts/overview/working-with-objects/labels/
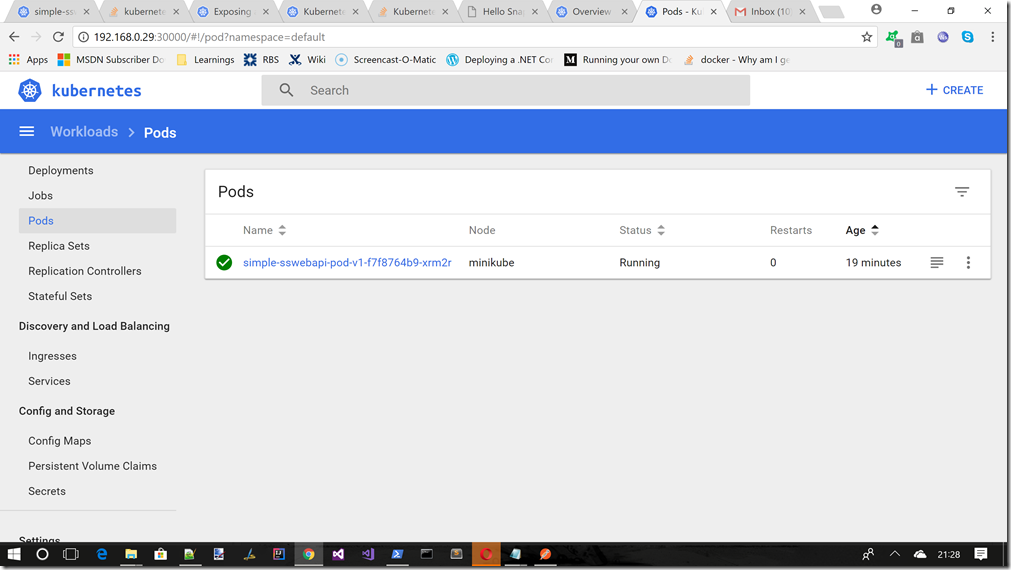
Pod in dashboard
If we ran the command c:\minikube dashboard, and moved to the Pods section we should now see this
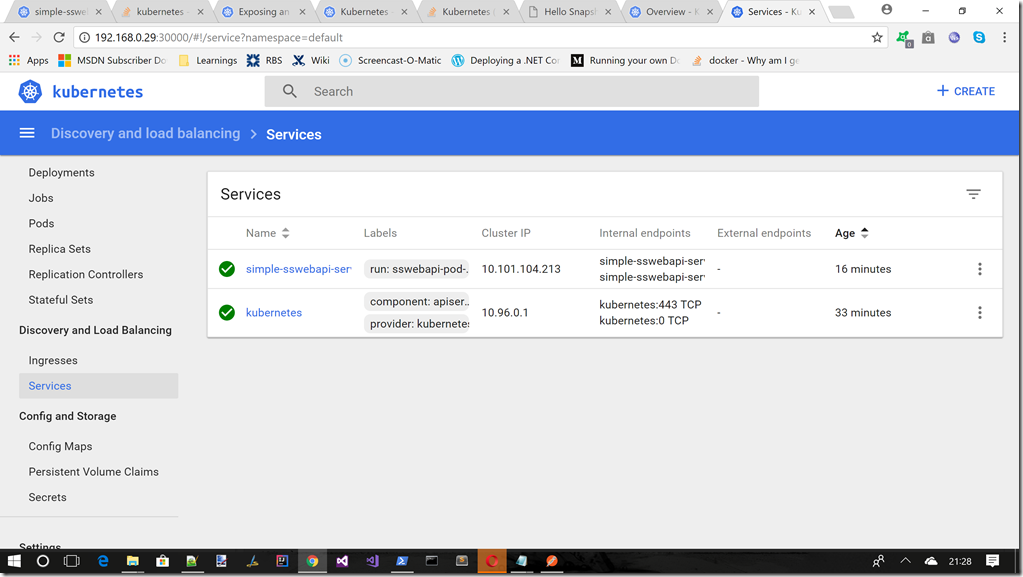
Service in dashboard
If we ran the command c:\minikube dashboard, and moved to the Services section we should now see this
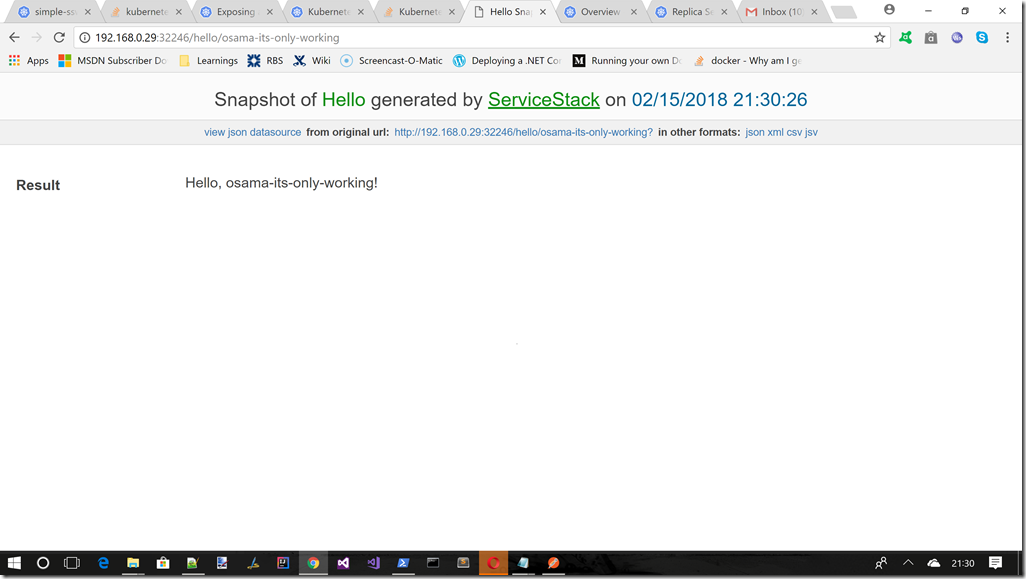
Testing the endpoint from a browser
If we ran the command c:\minikube service simple-sswebapi-service –url, and took a note of whatever IP address it gave us we can test the deployment via a browser windows, something like the following
Declarative Nature Of Kubernetes
One of the best things about Kubenetes in my opinion is that is is declarative in nature, not imperative. This is great as I can just say things like replicas: 4. I don’t have to do anything else and Kubernetes will just ensure that this agreement is met. We will see more of this in later posts, but for now just realise that the way Kubernetes work is using a declarative set of requirements.
MiniKube Setup Using A Private Repository
This workflow will setup a private Docker repository on port 5000, that will be used by MiniKube. This obviously saved the full round trip to Docker Cloud.
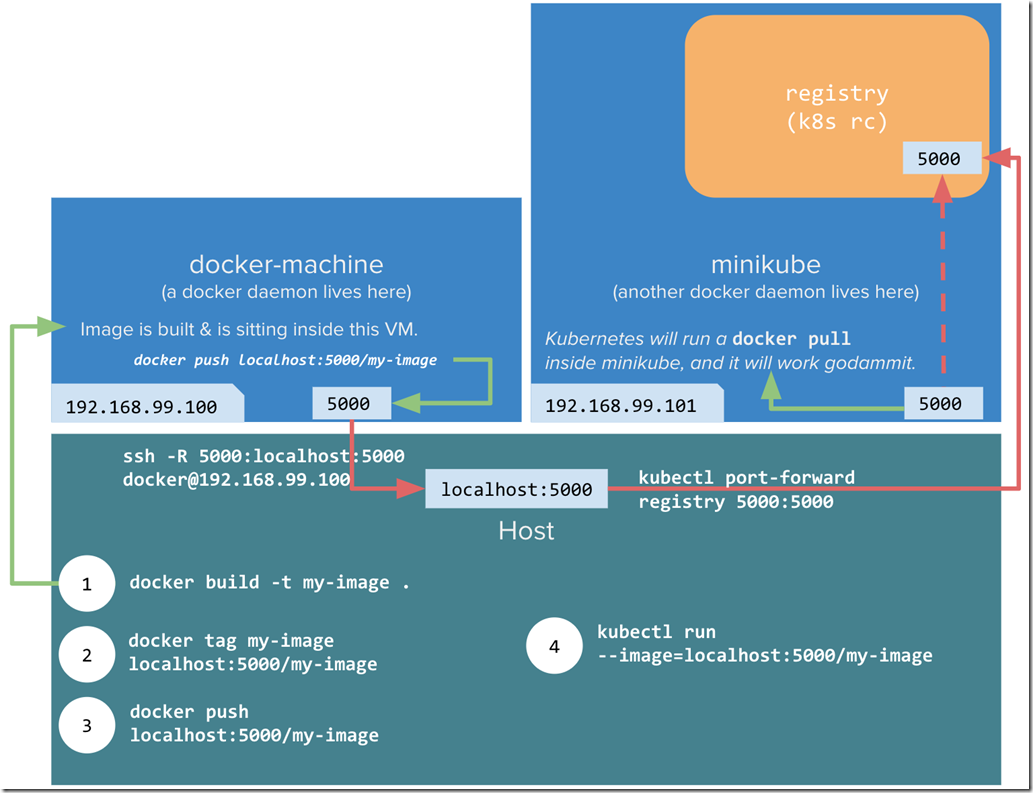
Image taken from https://blog.hasura.io/sharing-a-local-registry-for-minikube-37c7240d0615 up on date 19/02/18
Although its slightly out of scope for this post this section shows you how you should be able to host a private Docker repository in the Docker daemon that lives inside the MiniKube VM that we setup in post 1. Luckily Docker allows its own registry for images to be run as a container using this image : https://hub.docker.com/_/registry/
Which allows you to run a private repository on port 5000
docker run -d -p 5000:5000 --restart always --name registry registry:2
This should then allow you to do things like this
docker pull ubuntu
docker tag ubuntu localhost:5000/ubuntu
docker push localhost:5000/ubuntu
This obviously saves you the full round trip from your PC (Docker Daemon) –> Cloud (Docker repo) –> your PC (MiniKube)
As its now more like this your PC (Docker Daemon) –> your PC (Docker repo)–> your PC (MiniKube) thanks to the local private repo
The idea is that you would do something like this
NOTE : that the 5000 port is also the default one used by the .NET Core Kestrel http listener, so we would need to adjust the port in the Dockerfile for this article, and how we apply the Docker file into Kubernetes to use a different port from 5000, but for now lets carry on with how we might setup a private Docker repo)
in PowerShell
c:\
cd\
minikube.exe start --kubernetes-version="v1.9.0" --vm-driver="hyperv" --memory=1024 --hyperv-virtual-switch="Minikube Switch" --v=7 --alsologtostderr --insecure-registry localhost:5000
minikube docker-env
& minikube docker-env | Invoke-Expression
kubectl.exe apply -f C:\Users\sacha\Desktop\KubernetesExamples\Post2_SimpleServiceStackPod\sswebapp\LocalRegistry.yaml
Then in a Bash shell
kubectl port-forward --namespace kube-system \
$(kubectl get po -n kube-system | grep kube-registry-v0 | \
awk '{print $1;}') 5000:5000
Then back into PowerShell
cd C:\Users\sacha\Desktop\KubernetesExamples\Post2_SimpleServiceStackPod\sswebapp
docker build -t "sswebapp:v1" .
docker tag sacha/sswebapp:v1 localhost:5000/sacha/sswebapp:v1
docker push localhost:5000/sacha/sswebapp:v1
kubectl run simple-sswebapi-pod-v1 --replicas=1 --labels="run=sswebapi-pod-v1" --image=localhost:5000/sacha/sswebapp:v1  --port=5000
kubectl expose deployment simple-sswebapi-pod-v1 --type=NodePort --name=simple-sswebapi-service
kubectl get services simple-sswebapi-service
minikube service simple-sswebapi-service --url
Obviously you will need replace bits of the above with you own images/paths, but that is the basic idea.
If you cant follow this set of instructions you can try these 2 very good articles on this :
Word Of Warning About Using MiniKube For Development
Minikube ONLY supports Docker Linux Containers so make sure you have set Docker to use that NOT Windows Containers. You can do this from the Docker system tray icon.


