PreAmble
This post will be about building the bear bones no thrills client portion of the web site that is part of my ongoing (well this is the first, so ongoing after this) set of posts which I talk about here :
https://sachabarbs.wordpress.com/2017/05/01/madcap-idea/, where we will be building up to a point where we have a full app using lots of different stuff, such as these
- WebPack
- React.js
- React Router
- TypeScript
- Babel.js
- Akka
- Scala
- Play (Scala Http Stack)
- MySql
- SBT
- Kafka
- Kafka Streams
Introduction
So let me just apologize for how long this one has taken to put together, I never envisaged that this post would take me quite as long as it has. That said it has only taken 5-6 days where I have spent a maximum of 2 hours on it, and when I started this post I had a VERY rough idea of how webpack worked and what it did, but I had NEVER tried to create a webpack project from scratch, so not so bad in the end, I am fairly happy with the results.
Where is the code?
If you prefer to just have a look at the end result you can see that here : https://github.com/sachabarber/MadCapIdea
What did I want to get to work VS what is working?
Before I started this post/code I had a set list of requirements in mind, which I will show in the table below. I will also show whether I managed to get that feature to work or not
| Feature | Does It Work |
| I wanted to use Web pack to manage the build | Yes |
| I wanted to use Typescript via Babel to regular JavaScript | Yes |
| I wanted 3rd party libraries to be used with their typing information | No |
| I wanted to be able to bundle my eventually transpiled JavaScript code into a single bundle | Yes |
| I wanted to be able to use SCSS/SASS for my CSS needs and have them transpiled to CSS | Yes |
| I wanted to be able to bundle my eventually transpiled CSS code into a single bundle | Yes |
| I wanted to be able to import/export stuff (JS /CSS / Files etc etc) using ES6 modules | Yes |
| I wanted to be able to trace back from minified JavaScript bundle back to my original TypeScript via SourceMaps | Yes |
| I wanted to be able to use a fully SourceMap enabled DEVELOP version of my webpack setup | Yes |
| I wanted to be able to run a streamlined (minification, no comments, no console.log, no SourceMap) PRODUCTION version of my webpack setup | Yes |
| I wanted to be able to use React | Yes |
| I wanted to be able to use Bootstrap-React | Yes |
| I wanted to have the option to use JQuery/Lodash as I would in a simple standard JavaScript project, ie as “$” and “_” respectively | Yes |
As you can see I did actually manage to get ALL of this to work with the one exception of the typings for 3rd party libraries. The code still works at runtime, but there is just something hinky going on outside of runtime.
<rant>
I would just like to spend a moment ranting about just how much disinformation is out there on the whole module/typescript/webpack space. I must have read about 100 posts, all with different setups, all with different tsconfig.json files, all suggesting different webpack setups. On one hand my god weback/TypeScript are cool, but you have to be VERY careful what you apply. If you get your tsconfig.json into an invalid state, you just may find that editing TypeScript no longer works inside Visual Studio.
I have lost track of just how many different approaches I took to try and resolve the unknown module issue in TSX (TypeScript JSX react files). Even the official walk through on the TypeScript.org web site doesn’t work for me. Things I tried and failed at were
- Including typings in my tsconfig.json
- Include reference headers in my TypeScript files
- Including a reference.ts file for 3rd party typings
- Messing about with moving types\xxxxFramework into full blown NPM Dependencies rather than NPM DevDependencies
- Various module settings inside of tsconfig.json
All failed, so if anyone out there that is a TypeScript / React / WebPack guru, please let me know what I am doing wrong. The funny thing is that EVERYTHING is 100% fine at runtime.
</rant>
Ah that feels better, anyway now that, that is out of my system, lets continue shall we….
Webpack fundamentals
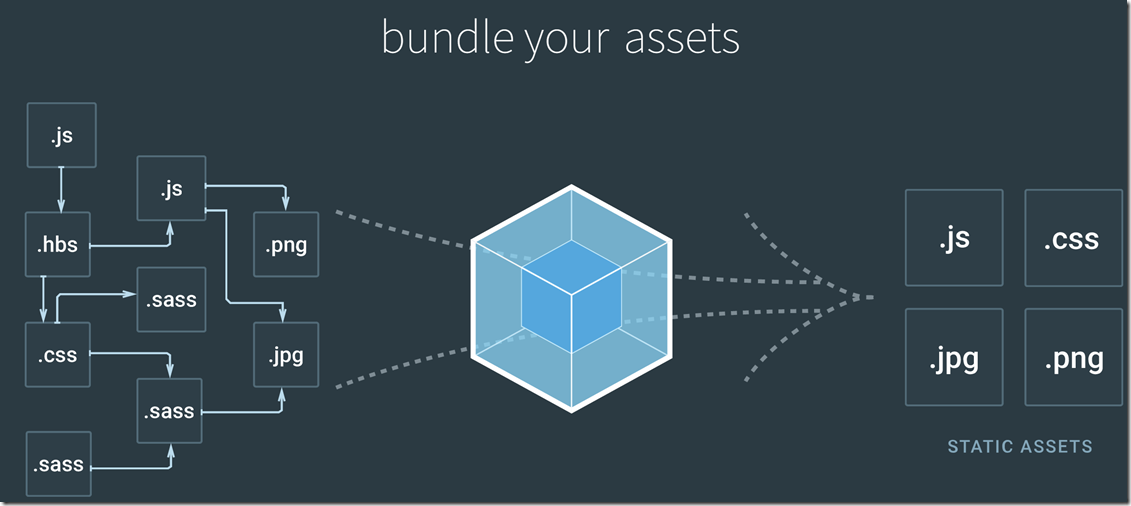
So what exactly is webpack. I think this image from the webpack web site https://webpack.js.org/ does a fairly good job of described at a glance what webpack is all about
So clear? No? Ok lets try some words as well
- Webpack at its heart is a bundler which is able to offer module support, and is able to bundle a lot of different things into bundles
- Webpack is able to bundle lots of thing via a technique called “loaders”, loaders can be piped one to the next (just like a command line)
- Webpack also offers module support for
- AMD
- CommonJS
- ES6 modules
- Webpack comes with SourceMap support (one of my favorite things ever, maybe even better than ice cream, but no where near as good as BBQ food and beers)
- Webpack comes with inbuilt minification support (thanks to Uglify.js : https://www.npmjs.com/package/uglifyjs)
- Webpack works seamlessly with NPM (Node package manager)
- Webpack is able to watch your files and produce new packages based on the diff of what you edited compared to what was previously built
- Webpack supports the idea of base/different configs such that you may have different environment configs DEV|PROD (typically you want loads of debugging aids in dev)
So in a nutshell that is what webpack is all about. We will dive into some of the sub areas in a bit more details below before we examine the actual use cases that I set out to solve
This may all seem a bit overwhelming, but with webpack it mainly boils down to a config file (typically called webpack.config.js). Here is a minimal example
const { resolve } = require('path');

const webpack = require('webpack');

// plugins
const HtmlWebpackPlugin = require('html-webpack-plugin');

module.exports = (env) => {

  return {
    context: resolve('src'),
    entry: {
      app: './main.ts'
    },
    output: {
      filename: '[name].[hash].js',
      path: resolve('dist'),
      // Include comments with information about the modules.
      pathinfo: true,
    },

    resolve: {
        extensions: [
            '',
            '.js',
            '.ts',
            '.tsx'
        ]
    },

    devtool: 'cheap-module-source-map',

    module: {
      loaders: [
        { test: /\.tsx?$/, loaders: [ 'awesome-typescript-loader' ], exclude: /node_modules/ }
      ],
    },

    plugins: [

      new HtmlWebpackPlugin({
        template: resolve('src','index.html')
      })

    ]

  }
};
We will be diving into this, and a lot more within this post.
Node
As stated Node/NPM is a fairly vital part of working with webpack, so you will need to ensure you have done the following as a minimum
- Installed node
- Installed NPM
- Installed webpack globally : npm install webpack –g
Most of the stuff I talk about in this post requires installing via NPM. But You have a copy of all the requirements inside the package.json file. Which at the time of writing this post looked like this
{
  "name": "task1webpackconfig",
  "version": "1.0.0",
  "description": "webpack 2 + TypeScript 2 + Babel example",
  "repository": {
    "type": "git",
    "url": "git+https://github.com/sachabarber/MadCapIdea.git"
  },
  "keywords": [
    "babel",
    "typescript",
    "webpack",
    "bundling",
    "javascript",
    "npm"
  ],
  "author": "sacha barber",
  "homepage": "https://github.com/sachabarber/MadCapIdea#readme",
  "dependencies": {
    "bootstrap": "^3.3.7",
    "jquery": "^3.2.1",
    "lodash": "^4.17.4",
    "react": "^15.5.4",
    "react-bootstrap": "^0.31.0",
    "react-dom": "^15.5.4",
    "webpack": "^2.5.0",
    "webpack-merge": "^4.1.0"
  },
  "devDependencies": {
    "@types/jquery": "^2.0.43",
    "@types/lodash": "^4.14.63",
    "@types/react": "^15.0.24",
    "@types/react-dom": "^15.5.0",
    "awesome-typescript-loader": "^3.1.3",
    "babel-core": "^6.24.1",
    "babel-loader": "^7.0.0",
    "babel-preset-es2015": "^6.24.1",
    "babel-preset-es2015-native-modules": "^6.9.4",
    "babel-preset-react": "^6.24.1",
    "css-loader": "^0.28.1",
    "extract-text-webpack-plugin": "^2.1.0",
    "html-webpack-plugin": "^2.28.0",
    "node-sass": "^4.5.2",
    "on-build-webpack": "^0.1.0",
    "sass-loader": "^6.0.3",
    "source-map-loader": "^0.2.1",
    "typescript": "^2.3.2",
    "webpack": "^2.4.1"
  },
  "scripts": {
    "build-dev": "webpack -d --config webpack.develop.js",
    "build-prod": "webpack --config webpack.production.js"
  }
}
Loaders
Loaders are probably the MOST important webpack concept to learn. There is practically a loader for EVERYTHING. But what exactly is a loader?
Well quite simply, a loader is a way to take some source file contents, and bundle it up in the final artifact. However things can get more sophisticated as some loaders are also able to transpile (act of converting code written in one language into another language say TypeScript –> JavaScript, or ES6 JavaScript –> ES5 JavaScript).
Loaders may also be piped together where the loaders declared run from right most to left most (or bottom to top, if you have them over multiple lines). This is EXTREMELY powerful, as it enables this sort of workflow in the demo code
- Write code in TypeScript (using good stuff like classes (ok ES6 has those but you get me), interfaces, async-await etc etc)
- Have that run through Babel.Js (bring future JS functions to you by converting your future JS into JS that runs in browsers now)
- Finally into plain old JS that is compatible with today’s browsers (they will all catch up one day, actually they won’t so yeah babel.js is here to help)
Loaders are not just for JS, they can be used for CSS/Images/Fonts all sorts of things
We will see examples on this stuff when we get into the guts of things
Code dissection
In this section we will dissect the code contained at the github repo, and talk through all my initial requirements and see how they ended up being implemented
Bundles
One of the main reason to want to use webpack is for its bundling abilities, where I wanted to be able to bundle the following things
- Typescript which is transpiled to JavaScript (thanks to a TypeScript loader)
- SCSS/SASS/Css (thanks to a Sass loader)
- Images(thanks to a Url loader)
So that is what we are trying to bundle, but there are a few things that need to be done to make that happen, so lets start with the loaders (I will be covering images and fonts later, so for now lets just talk about JavaScript and CSS bundling)
JavaScript Bundling
As I say I wanted the option to use TypeScript or regular JavaScript, and I also wanted to be able to use SASS or regular CSS so we start with these loaders which will traverse the source code and find all the relevant files (see the little regex that’s used to find the files) and will then bundle these files
let _ = require('lodash');
let webpack = require('webpack');
let path = require('path');
let fs = require("fs");
let WebpackOnBuildPlugin = require('on-build-webpack');
let ExtractTextPlugin = require('extract-text-webpack-plugin');
let HtmlWebpackPlugin = require('html-webpack-plugin');

let babelOptions = {
    "presets": ["es2015", "react"]
};

function isVendor(module) {
    return module.context && module.context.indexOf('node_modules') !== -1;
}

let entries = {
    index: './src/index.tsx'

};

let buildDir = path.resolve(__dirname, 'dist');

module.exports = {

    context: __dirname,

    entry: entries,

    output: {
        filename: '[name].bundle.[hash].js',
        path: buildDir
    },


    resolve: {
        extensions: [".tsx", ".ts", ".js", ".jsx"],
        modules: [path.resolve(__dirname, "src"), "node_modules"]
    },

    plugins: [


        // creates a common vendor js file for libraries in node_modules
        new webpack.optimize.CommonsChunkPlugin({
            names: ['vendor'],
            minChunks: function (module, count) {
                return isVendor(module);
            }
        }),

        // creates a common vendor js file for libraries in node_modules
        new webpack.optimize.CommonsChunkPlugin({
            name: "commons",
            chunks: _.keys(entries),
            minChunks: function (module, count) {
                return !isVendor(module) && count > 1;
            }
        }),


        //scss/sass files extracted to common css bundle
        new ExtractTextPlugin({
            filename: '[name].bundle.css',
            allChunks: true,
        }),

        new HtmlWebpackPlugin({
            filename: 'index.html',
            template: 'template.html',
        })
    ],

    module: {
        rules: [
            // All files with a '.ts' or '.tsx' extension will be handled by 'awesome-typescript-loader' 1st
            // then 'babel-loader'
            // NOTE : loaders run right to left (think of them as a cmd line pipe)
            {
                test: /\.ts(x?)$/,
                exclude: /node_modules/,
                use: [
                  {
                      loader: 'babel-loader',
                      options: babelOptions
                  },
                  {
                      loader: 'awesome-typescript-loader'
                  }
                ]
            },


            // All files with a .css extenson will be handled by 'css-loader'
            {
                test: /\.css$/,
                loader: ExtractTextPlugin.extract(['css-loader?importLoaders=1']),
            },

            // All files with a .scss|.sass extenson will be handled by 'sass-loader'
            {
                test: /\.(sass|scss)$/,
                loader: ExtractTextPlugin.extract(['css-loader', 'sass-loader'])
            },


            // All files with a '.js' extension will be handled by 'babel-loader'.
            {
                test: /\.js$/,
                exclude: /node_modules/,
                use: [
                  {
                      loader: 'babel-loader',
                      options: babelOptions
                  }
                ]
            },


            // All output '.js' files will have any sourcemaps re-processed by 'source-map-loader'.
            {
                enforce: "pre",
                test: /\.js$/,
                loader: "source-map-loader"
            }
        ]
    }
};
The bulk of the code above is made up of loaders. But there are a few things above that deserve special call outs, namely
Resolve
This tells us what type of files webpack should try and resolve
resolve: {
	extensions: [".tsx", ".ts", ".js", ".jsx"],
	modules: [path.resolve(__dirname, "src"), "node_modules"]
},
Entry
These are the main entry points into the code. So for me this is the index.tsx file.
let entries = {
    index: './src/index.tsx'

};


entry: entries,
Output
This is where you tell webpack what the name of your final bundles will be, which will contain all the code files that matches the regex test that was setup in the loaders. It is VERY important to note that ALL the files that matches the loader regex will become part of the bundle file.
output: {
	filename: '[name].bundle.[hash].js',
	path: buildDir
},
TypeScript
I wanted the option to be able to use TypeScript IF I WANTED to. So to do this we need a webpack loader, there are a couple of TypeScript loaders for webpack. But I went with awesome-typescript-loader. I also want to run my TypeScript files through Babel. We will get onto what Babel brings to the party in just a second, but for now just understand that TypeScript and Babel act as transpilers where they take JavaScript using features that is not available in regular JavaScript and transpile that code into regular JavaScript that today’s browsers understand. Obviously since the final product of both TypeScript and Babel is regular JavaScript we also need a loader for that too.
Here is my TypeScript/Babel/JavaScript setup.
// All files with a '.ts' or '.tsx' extension will be handled by 'awesome-typescript-loader' 1st
// then 'babel-loader'
// NOTE : loaders run right to left (think of them as a cmd line pipe)
{
	test: /\.ts(x?)$/,
	exclude: /node_modules/,
	use: [
	  {
		  loader: 'babel-loader',
		  options: babelOptions
	  },
	  {
		  loader: 'awesome-typescript-loader'
	  }
	]
},

// All files with a '.js' extension will be handled by 'babel-loader'.
{
	test: /\.js$/,
	exclude: /node_modules/,
	use: [
	  {
		  loader: 'babel-loader',
		  options: babelOptions
	  }
	]
}
The other thing you need when working with TypeScript is a tsconfig.json file. Here is mine, you can see that I have configured mine to be react friendly.
{
  "compilerOptions": {
    "allowSyntheticDefaultImports": true,
    "moduleResolution": "node",
    "outDir": "./dist/",
    "sourceMap": true,
    "noImplicitAny": false,
    "module": "es2015",
    "target": "es5",
    "jsx": "react",
    "types" : ["jquery", "lodash", "react", "react-dom"]
  },
    "include": [
        "./src/**/*"
    ]
}
NOTE: You need to be a bit careful with this file, if you mess it up, you may find yourself in a quite sad position where you can no longer edit TypeScript files in Visual Studio.
Babel
I just showed you the babel loader, so I won’t repeat that. But just what is this Babel you speak of. Well here the blurb from the Babel.js website
Babel has support for the latest version of JavaScript through syntax transformers. These plugins allow you to use new syntax, right now without waiting for browser support.
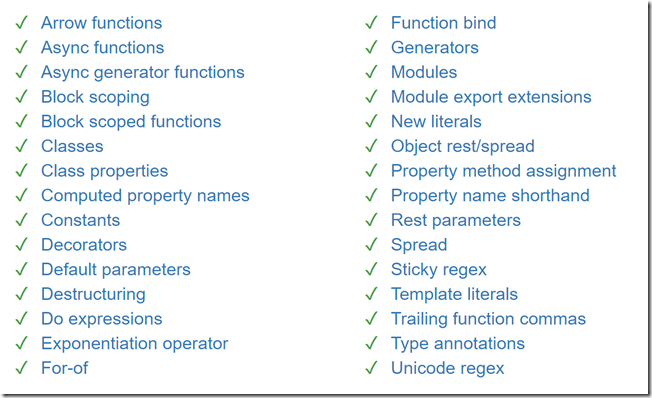
This is the sort of stuff that Babel allows you to write right now.
The only other thing you need for Babel is to give a little config file called .babelrc which for me just contains this
{ "presets": ["es2015","react"] }
And that is pretty much all there is to it, you can now use these features in your JavaScript. Neato
SCSS
I don’t mind CSS, but these days there are better tools out there, namely LESS/SASS. What these tools offer you are things like this
- Modular CSS (multiple files in a heirachy)
- Nested CSS rules
- Variables
- etc etc
So it seems strange NOT to want to work with this. As with most things in webpack, it starts with a loader, where we have support for SASS and also plain CSS. Remember loaders run from right to left, so in the case of the SASS/SCSS file match, the files will 1st run through the sass-loader the the css-loader. However for plain old CSS they just go through the css-loader
// All files with a .css extenson will be handled by 'css-loader'
{
	test: /\.css$/,
	loader: ExtractTextPlugin.extract(['css-loader?importLoaders=1']),
},

// All files with a .scss|.sass extenson will be handled by 'sass-loader'
{
	test: /\.(sass|scss)$/,
	loader: ExtractTextPlugin.extract(['css-loader', 'sass-loader'])
},
The other part of the puzzle to get CSS to work is this ExtractTextPlugin that you can see mentioned in the loader sections just above. What the ExtractTextPlugin does is to extract all the text from the individual CSS files (yep that’s right SASS/SCSS is transpiled to regular CSS) into a single CSS file.
//scss/sass files extracted to common css bundle
new ExtractTextPlugin({
    filename: '[name].bundle.[hash].css',
    allChunks: true,
}),
Don’t be too scared by the [name] and [hash] stuff just yet we will get onto to that later.
Bootstrap
So for those of you living under a rock there is a great library (started by Twitter engineers) to help create responsive uniform looking sites. This library is called twitter Bootstrap. It comes with various components and CSS, and use typeography for its icons.
Now Bootstrap is great, but I wanted to use React, and React has the concept of a virtual DOM, and generally speaking tries to work with it own Virtual DOM rather than the real DOM. This has led to a specialized version of Bootstrap specifically for use with React. Naturally I needed to get that to work. It is called React-Bootstrap.
So once we have it installed via NPM we just need to worry about a few small thing
Images
These are loaded by (surprise surprise) another bootstrap loader section
{
	test: /\.png$/,
	loader: "url-loader?limit=100000"
},

{
	test: /\.jpg$/,
	loader: "file-loader"
},

{
	test: /\.svg(\?.*)?$/,
	loader: 'url-loader?prefix=fonts/&name=fonts/[name].[ext]&limit=10000&mimetype=image/svg+xml'
},
Fonts
Fonts are also loaded by more webpack loaders
{
	test: /\.woff(\?.*)?$/,
	loader: 'url-loader?prefix=fonts/&name=fonts/[name].[ext]&limit=10000&mimetype=application/font-woff'
},

{
	test: /\.woff2(\?.*)?$/,
	loader: 'url-loader?prefix=fonts/&name=fonts/[name].[ext]&limit=10000&mimetype=application/font-woff2'
},

{
	test: /\.ttf(\?.*)?$/,
	loader: 'url-loader?prefix=fonts/&name=fonts/[name].[ext]&limit=10000&mimetype=application/octet-stream'
},

{
	test: /\.eot(\?.*)?$/, loader: 'file-loader?prefix=fonts/&name=fonts/[name].[ext]'
},
Css
So once you have all the other stuff done you can proceed to just use react-bootstrap. Here is a small example from one of my TypeScript files
import * as React from "react";
import * as ReactDOM from "react-dom";
import { Button } from 'react-bootstrap';

import 'bootstrap/dist/css/bootstrap.css';

export class Hello extends React.Component<HelloProps, undefined> {
    render() {
        return
<div>
                <Button bsStyle="primary" bsSize="large">Large button</Button>

<h1 id="helloText">Hello from {this.props.compiler} and {this.props.framework}!</h1>

               </div>

;
    }
}
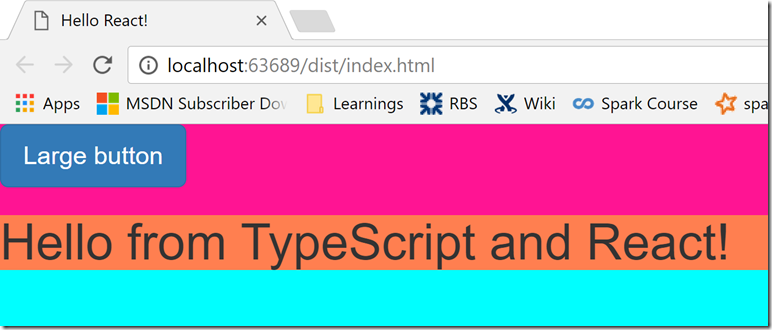
Which when rendered looks like this:
Lodash
Lodash is a kind of new underscore-esque library, which offers many convenience methods on collections. It is like the LINQ to obejcts of the JavaScript world. To work with Lodash you can simply import it as follows
import * as _ from "lodash";
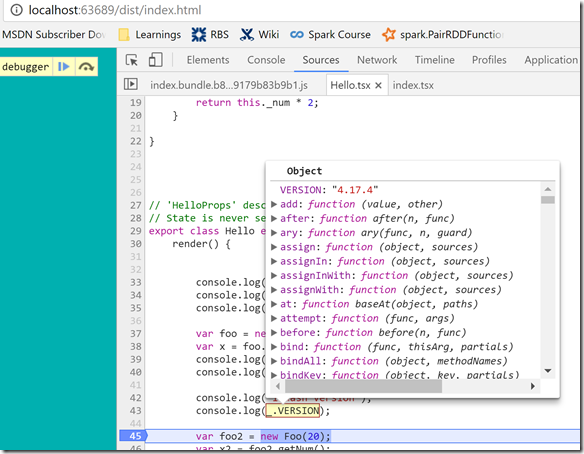
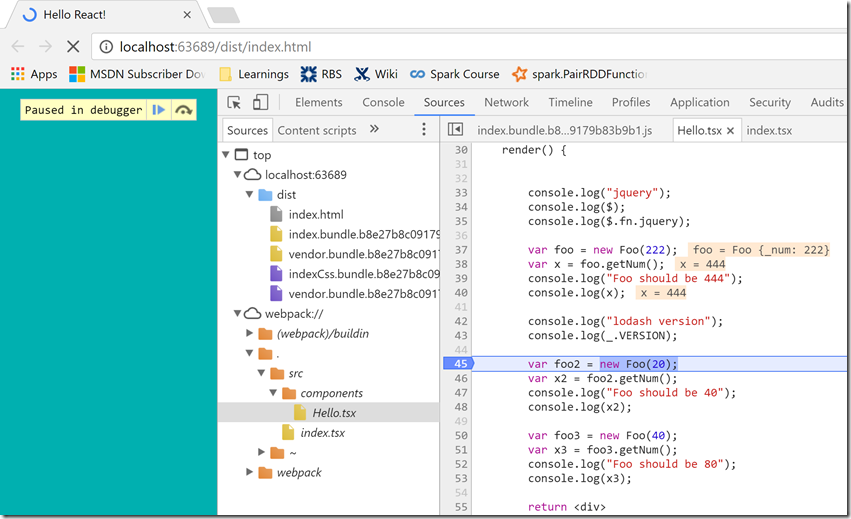
Which we could verify quite simply with something like this, where the image below is me finding the original line in my TypeScript file within the SourceMap that was sent to the browser and putting a break point on the line I wanted to debug
console.log(_.VERSION);
JQuery
Ah the blessed Jquery, love it or hate it, there is certainly a lot of it on the web. And at times it is still very convenient, so we should really allow for it too. Thing with JQuery is that it wants to be available as global variable $ or via a property on window. Is this even possible with webpack? Well yes it is, we simply add the following bit of config within the webpack Plugins section
//The ProvidePlugin makes a module available as a variable in every other
//module required by webpack
new webpack.ProvidePlugin({
    $: "jquery",
    jQuery: "jquery",
    "window.jQuery": "jquery"
}),
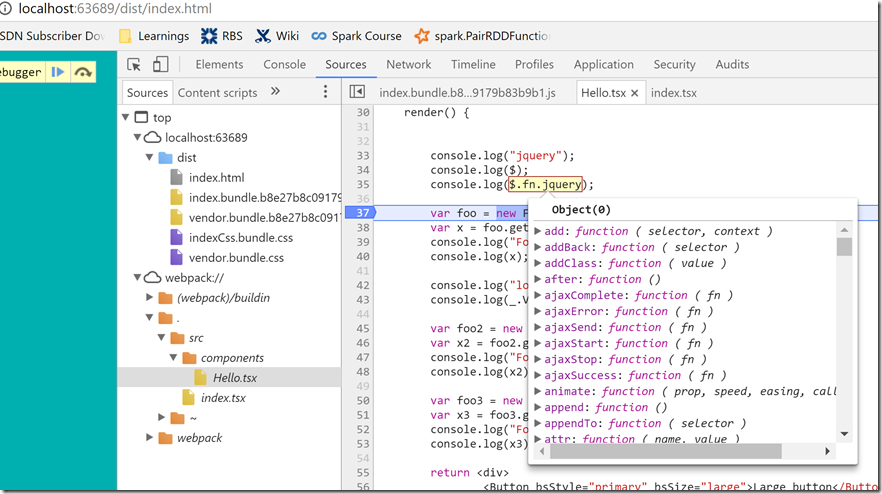
That then allows us to to use Jquery like this without having to ever import it anywhere, its just automatically globally available
console.log("jquery");
console.log($);
console.log($.fn.jquery);
Again I am using the emitted SourceMap to find my original TypeScript code
Source Map Support
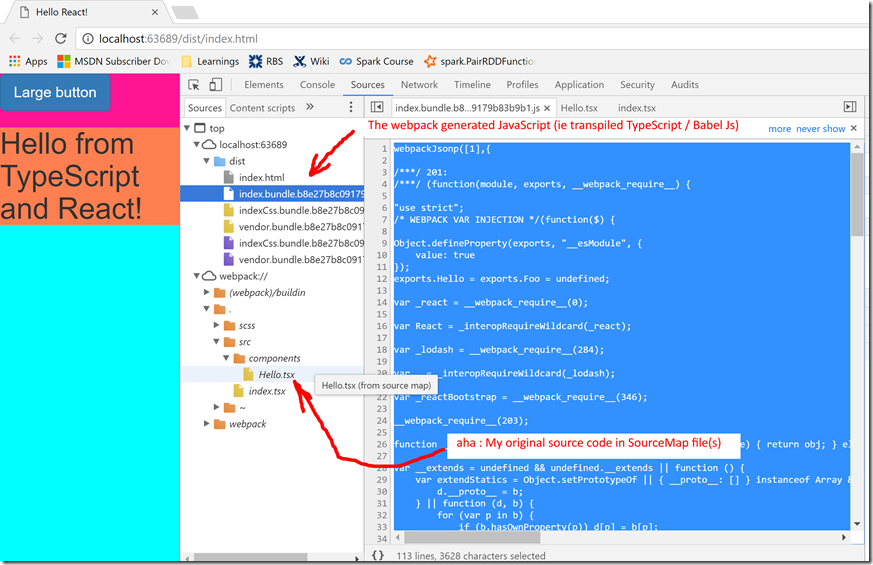
I also wanted to be able to debug my ORIGINAL TypeScript/JavaScript, so using SourceMaps WAS A MUST. By using source maps in webpack I am able to send the transpiled/bundled (but not minified I only do that in production mode), and also view the original code, and set break points in the original code.
This is the JavaScript bundle that webpack sent
And here is me inside the SourceMap file, see how I am in the original content here (ie the code I wrote)
This is enabled via the webpack setting
devtool: "source-map"
ES6 style code and modules
Another feature of using webpack is that you may using AMD/CommonJS modules (or if you included TypeScript/Babel ES6 modules). I am using TypeScript and Babel so I went with ES6 style modules, which means I can export/import things like this:
import * as React from "react";
import * as ReactDOM from "react-dom";
import * as _ from "lodash";
import { Button } from 'react-bootstrap';

import 'bootstrap/dist/css/bootstrap.css';

export interface HelloProps { compiler: string; framework: string; }

export class Foo {

    private _num: number;

    constructor(num: number) {
        this._num = num;
    }

    getNum() {
        return this._num * 2;
    }

}
Html Plugin
Ok hope you all recall but a while ago I promised to explain what was meant by [name] and [hash] in my webpack config.
- [name] : simply gets replaced by the current bundle name
- [hash] : produces a hash of the bundle
I think name is self explanatory, but [hash] is an interesting one. The idea of producing a hash for your bundles is great. That means if the file contents change the hash produced is different, so the browser cache would be invalidated.
That’s cool. But hang on how do we normally include script/css references in our Html page, either in Script/head tags right? And if the hash is changing all the time, how can we possible link to files where we don’t know what the hash will be.
Luckily we just use the HtmlWebpackPlugin, which does a great job of taking a template for the original HTML we want to end up with, and putting the final bundle generated references into a copy of the template and copying that final HTML file to the desired output directory.
So for me I have this webpack config
new HtmlWebpackPlugin({
    filename: 'index.html',
    template: 'template.html',
})
Where my template.html file looks like this
<!DOCTYPE html>
<html>
    <head>
        <meta charset="UTF-8" />
        <title>Hello React!</title>
    </head>
    <body>

<div id="example"></div>

        <!-- Main -->
    </body>
</html>
And once webpack / HtmlWebpackPlugin have run their magic, the resultant HTML (ie final HTML file) looks like this:
<!DOCTYPE html>
<html>
<head>
<meta charset="UTF-8" />
<title>Hello React!</title>
<link href="vendor.bundle.b8e27b8c09179b83b9b1.css" rel="stylesheet">
<link href="indexCss.bundle.b8e27b8c09179b83b9b1.css" rel="stylesheet"></head>
<body>
<div id="example"></div>
<!-- Main -->
<img src="data:image/gif;base64,R0lGODlhAQABAIAAAAAAAP///yH5BAEAAAAALAAAAAABAAEAAAIBRAA7" data-wp-preserve="%3Cscript%20type%3D%22text%2Fjavascript%22%20src%3D%22vendor.bundle.b8e27b8c09179b83b9b1.js%22%3E%3C%2Fscript%3E" data-mce-resize="false" data-mce-placeholder="1" class="mce-object" width="20" height="20" alt="<script>" title="<script>" />
<script type="text/javascript" src="index.bundle.b8e27b8c09179b83b9b1.js">
</body>
</html>
See how it just inserts the CSS/JS bundles for me, and my hashing for the bundles now seemlessly happens and I don’t have to worry about it ever again
Separate Configs
The final thing I wanted to cover was how to have different DEV/PROD webpack configs. Up until now I have just been showing you a base config file. But we can use webpack-merge to allow us to create bespoke webpack config files for specific environments.
For example here is my Develop webpack file (which is the same as the base config file)
let commonConfig = require('./webpack.config.js');
let webpack = require('webpack');
let Merge = require('webpack-merge');

module.exports = function (env) {
    return Merge(commonConfig, {})
}
Whilst this is my Production webpack config file where I want
- No SourceMap files
- No console.log
- No comments
- Minification
let commonConfig = require('./webpack.config.js');
let webpack = require('webpack');
let Merge = require('webpack-merge');

module.exports = function (env) {
    return Merge(commonConfig, {
        plugins: [
          new webpack.LoaderOptionsPlugin({
              minimize: true,
              debug: false
          }),
          new webpack.optimize.UglifyJsPlugin({
              // Eliminate comments
              comments: false,
              beautify: false,
              mangle: {
                  screw_ie8: true,
                  keep_fnames: true
              },
              compress: {
                  screw_ie8: true,

                  // remove warnings
                  warnings: false,

                  // Drop console statements
                  drop_console: true
              },
              comments: false,
              sourceMap: false
          })
        ]
    })
}
Conclusion
So that is all I wanted to say this time, as I stated in the 1st post I will be continuing to write posts which will be tracked on Trello : https://trello.com/b/F4ykCOOM/kafka-play-akka-react-webpack-tasks
